
If you are here reading this, I bet you are intrigued about long exposure photography and want to know how you can shoot great long exposure photos of your own.
Here is the good thing, you probably have 90% of everything you need to shoot long exposure photos.
All you are missing is one tool, and the tips and tricks to master this genre of photography. I will discuss that tool a little later in this discussion along with the rest, but to start let’s discuss what is long exposure photography.
Note: If you’re just getting started with long exposure photography, make sure to check out my article on long exposure ocean photography too! Even though it’s about shooting seascapes, it still contains very useful tips about shooting any kind of long exposure.
What are Long Exposure Photos?
Long exposure photos involve keeping the shutter curtains open for a long duration so that light reaches the sensor over an extended period. The ultimate objective is to blur out certain elements in the frame while keeping the others sharp.
So, flowing water, moving people, a ballerina going about her routine, people on the streets, anything can be a subject for long exposure photos.
A shutter speed of 1/10 or 1/15, or 1/20 and faster is a slow shutter speed. A shutter speed of anything above 1/100 is considered a fast shutter speed. These are examples of normal shutter speeds.
A shutter speed of 1 second or slower is considered a long shutter speed. So, 1 second or 2 seconds or 5 seconds are all examples of slow shutter speeds.
A long exposure photograph is shot usually with a long shutter speed, though in some cases it can be shot using a slow shutter speed as well. This depends on the amount of ambient light as well as the scene you are shooting.
Let’s say you are photographing a ballerina in ambient light. The fast movements of the ballerina allow you to use a slow shutter speed and yet capture that image blur.
Long exposure photos can be broadly divided into two segments – (a) those which are shot during daylight and (b) those which are shot during nighttime. The latter is always easier to shoot because all you need is a camera, a lens, and a tripod.
Shooting long exposure daytime photos is a little difficult because you have to think in terms of dragging the shutter (slow it down) to allow light to enter over a long period. That throws some inherent challenges, especially when you are making long exposures in broad daylight.
This is where you need that one additional item apart from the other tool – an ND filter.
Can You Shoot Long Exposure Daytime Photos?
Long exposure daytime photos are possible provided you know what you are doing, and you have the right tools. Apart from cameras, lenses, and tripods, you need an ND filter.
You would require the shutter curtains inside the camera to remain open for a long time. Sometimes more than one second. But that long exposure can burn the photo (create an overexposed photo) because there is a lot of ambient light to go around, and with nothing left salvageable.
You need a solution to cut down on the ambient light and this is what the ND filter allows you to do.
What are ND Filters?

An ND filter is a glass filter that mounts on to the front of your lens. Its sole purpose is to block light. ND filters come with different light-stopping powers. Higher the number associated with an ND filter more is the light stopping power of that filter.
A variable ND filter, on the other hand, is made using two circular polarizing filters one mounted on top of the other. It screws onto the front element of the lens as usual. However, there is a second ring on the filter. Turning that ring will increase or decrease the amount of light that gets through. Thus, the name variable ND filter.
I recommend a solid ND filter instead of a variable ND filter. Since variable ND filters are made up of two different circular polarizing filters, there is more risk of light leaks, especially if it’s bright outside.
If it comes down to it, you can get away with using a variable ND filter, but if you have the choice, definitely try to get a solid ND filter.
What Do You Need to Shoot Long Exposure Daytime Photos?
Okay, very quickly let’s list the tools you need to create long exposure daytime photos. I have already mentioned these in the above paragraphs separately but here is the complete list.
- Camera: Any camera will do as long as you can change the shutter speed.
- Lens: I recommend a wide angle lens because it has the potential to capture a dramatic scene with moving water or clouds.
- Tripod: A tripod is essential because it helps stabilize your camera over a long exposure.
- ND filter (preferably solid ND filter): This will help stop the amount of light requiring a long exposure.
- Cable Release or Remote Control: Allows you to trigger the shutter without touching the camera which prevents camera shake.
Examples of Long Exposure Photos
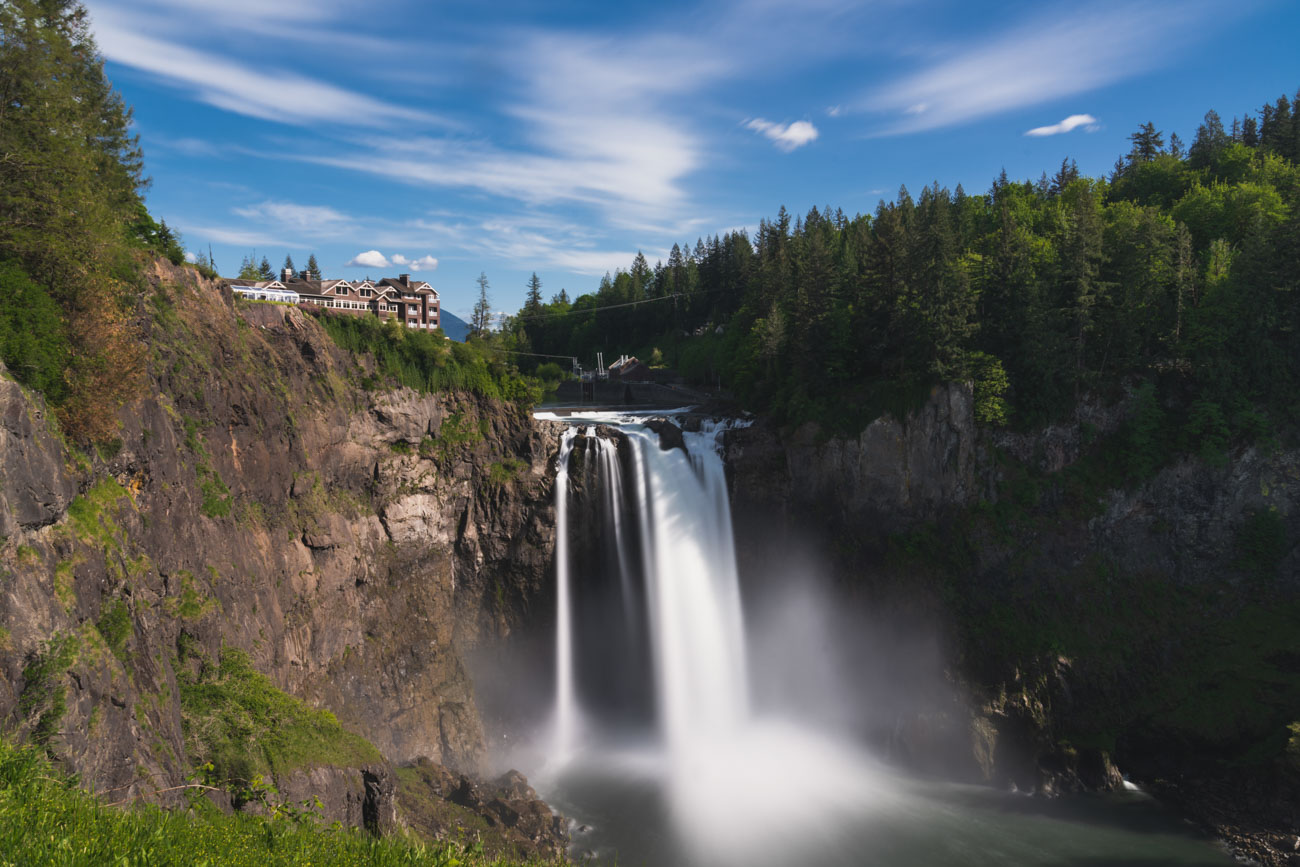
1. Waterfall Long Exposure
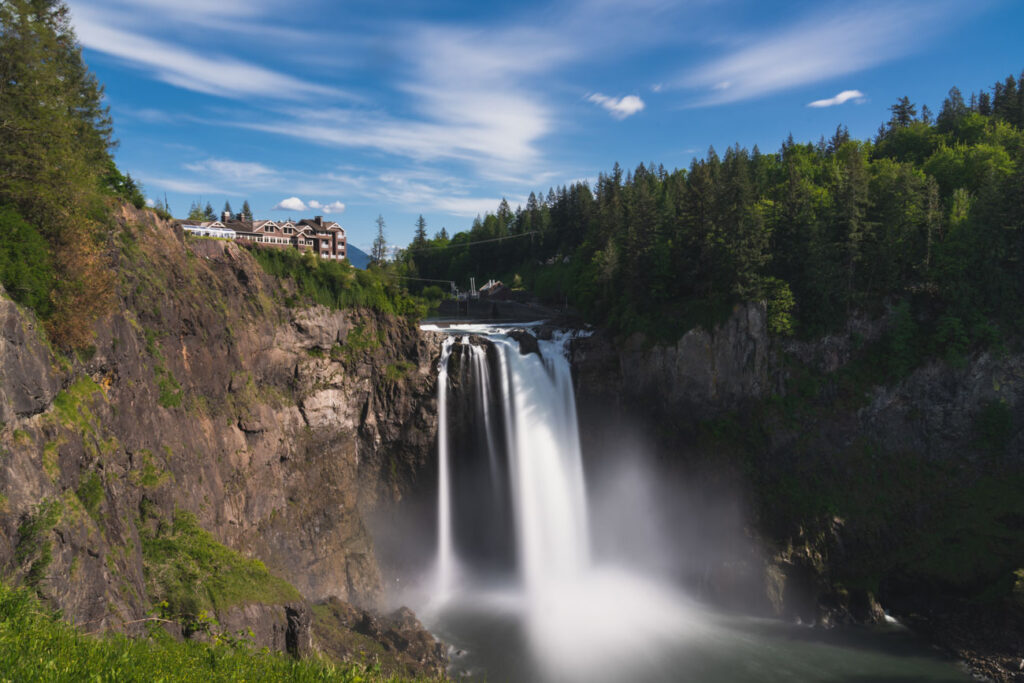
Waterfalls are great subjects for daylight-long exposure photos. Why? Because there is a lot of movement in the scene and that allows you to capture a scene that has at least a part of it blurry. The rest of the scene can be perfectly sharp.
Choose a wide-angle lens because a wide-angle lens allows you to capture the grandeur of the scene in a much better way. Anything between 14mm a 14mm is a good lens for such a shot.
Set up your composition, then set up the exposure. After the exposure is set, mount the ND filter. If you need to make double the exposure time, then choose a 0.3 ND or an ND 2 filter. if you need to quadruple the exposure time then choose an ND 0.6 or an ND 4 filter.
Afterward, adjust the exposure accordingly. Meaning if you mounted a 0.3 ND filter then double the exposure time because a 0.3 ND filter reduces the amount of light entering the camera by half effectively forcing you to double your exposure time. If it was 1/10 of a second make it 1/5 of a second to compensate.
Notice as you are doubling the exposure time (keeping the shutter curtain open for longer duration) you are allowing light to enter over a longer period and in the process whatever movements that are happening in front of the camera are getting captured by the camera as motion blur.
Pro Tip: Did you know a 10-stop ND filter has the maximum light stopping power and is used by photographers to shoot extremely long shutter speeds of 10 seconds and more?
2. Empty Streets

An interesting long exposure technique is shooting in the daytime with a 10-stop ND filter to help remove people from the image.
In this example, the shutter speed just wasn’t slow enough to blur out all the people, but it gives you a good idea of what’s possible.
So, let’s say that you are at a popular tourist spot at the busiest time of the day. You didn’t plan that but your tour bus dropped you off against your wishes.
So, what to do?
Should you come back again at a different time? What if this is the only time you get an opportunity to photograph?
The trick is to use the darkest ND filter you have. i.e., the ND filter that comes with the highest number. I recommend a 10-stop filter. In case you don’t have a 10-filter choose the next best one.
Set-up, compose, meter based on the scene, then drag the shutter speed to ensure that it is now compensating for the amount of light. You can easily calculate this by using the formula:
- Final shutter speed = base shutter speed x 2ⁿ
- Where n stands for the ND filter’s light stopping power.
- Finally, mount the 10-stop ND filter.
Let’s say that you metered the scene at 1/250 sec at ISO 100. After mounting the 10-stop ND filter your exposure will become 64 seconds.
With an exposure time of 64 seconds, any movements of people around the location will completely melt away resulting in an image where the site will appear devoid of people. Can you envision something like that? The Colosseum, or the Duomo di Milano or the Taj Mahal completely to yourself with not a soul around?
There will be one or two people here and there who will not move overall for several seconds and those people will appear in the final photo. But those can be removed using software like Adobe Photoshop.
Top 3 Long Exposure Photography Tips
Long exposure photography is an interesting genre and its limitations revolve around the photographer’s creative limitations. In other words, the potential to create amazing photos is limitless in the right hands.
Some basic aspects govern whether the image will come through as something awesome.
1. Composition
Composition is critical. It is the most important of all the parameters. Composition decides the elements that you are going to include in the frame and the elements that are to be excluded from the frame.
The basic rule is if it is not adding to the composition then it is a distraction and needs to be eliminated. You can recompose so that the distracting element is not in the frame or you can physically remove the element (or for it to move out of the frame) so that the composition is closer to what you want.
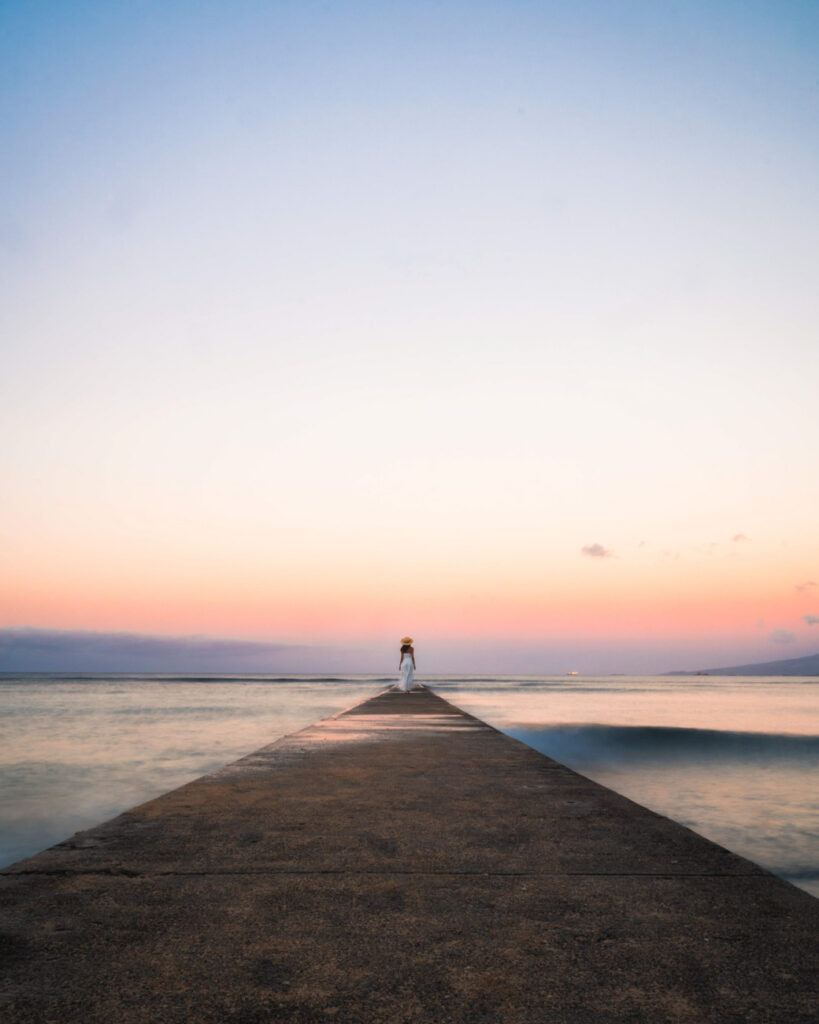
For example in this image, I used the rule of thirds and leading lines in combination with long exposure to create a more powerful and peaceful image.
2. Understanding of Light
A critical aspect of shooting long exposure photos is to understand how light works and how the camera mechanism (with little help from tools like ND filters) can manipulate it to produce long exposure daytime photos.
3. Tripod

In order to get the sharpest long exposure photography possible, you need a sturdy tripod. During the exposure, any minor movement will impact your photograph so it’s important to use the sturdiest tripod you can get your hands on.
Similar to most other camera gear-related investments, I recommend getting the best quality one that you can afford. A better quality tripod will last longer, is usually easier to work with, and will save you both time and money in the long run.