

The Sony RX100 V is one of the most powerful compact cameras on the market. Although Sony has released the Sony RX100 VII, the Sony RX 100 V still holds its ground and is an awesome camera to have in your bag of tools.
I have owned the Sony RX100 V for a while now and one of my favorite ways to use the camera is to shoot 4k time-lapses with it. The compact size of the camera in combination with the still accessible Sony PlayMemories App makes setting up and shooting time-lapses incredibly easy in any situation you’re in.
In this ultimate guide, I’m going to go over everything you need to know to get out and shoot time-lapses with your Sony RX100 V camera. This includes:
- Downloading and installing the Sony PlayMemories Time Lapse App on your RX100 V camera. Still the best way to shoot time-lapses on this camera in my opinion.
- How to set up and shoot a time-lapse on your RX100 V
- Editing and post-production of the time lapse
- Examples of time lapses I have shot with the camera
Sony’s Update to the PlayMemories App
At the beginning of 2019, Sony replaced its PlayMemories app with its brand new app called Imaging Edge. Along with this big change, they also started to integrate the time-lapse functionality into their newer cameras like the RX100 VII, a7III, a7RIII, a7RIIII, and a9.
Even with these changes, I still think the PlayMemories Time-lapse app is the most convenient way to shoot time-lapses with older Sony cameras like the RX100 V.
I’m suspecting Sony will not update its PlayMemories Online Store anymore, but you are still able to access it and download the time-lapse app.
Here are all the RX camera models that are compatible with the PlayMemories Time-lapse app.
- Sony RX100 II
- Sony RX100 III
- Sony RX100 IIII
- Sony RX100 V
For the Sony RX100 VI, it kind of falls into a gap period so it’s not compatible with the PlayMemories Time-lapse app and does not have a built-in time-lapse shooting like the other newer cameras.
Fortunately, there are third-party time-lapse apps like the Camrote app, which will do pretty much the same thing if you don’t want to buy an intervalometer.
Downloading and Installing the Play Memories Time Lapse App on Your Camera
The main reason why I chose to purchase the PlayMemories Time Lapse App instead of opting for a free alternative or using an intervalometer is the ease of use of the app. It’s also only $9.99, which is cheaper than most intervalometers.
The last thing I want to happen when I am out in the field shooting is to have to worry about messing up the time-lapse because of the settings I pick. Once you get the hang of the PlayMemories App it is as easy as setting and forgetting it.
With that said, let’s get to installing the PlayMemories Time-lapse App onto your camera.
1.) If you don’t have a Sony Entertainment Network Account, you will need to create one which is easy to do. Here is the link in case you need it.
Unfortunately, there is no way around this. You will need an account to purchase the Time-lapse App or any other app in the PlayMemories store.
Note: If you’re a PlayStation owner, you can use your PlayStation Network login credentials to sign in.
 Source: Sony Entertainment Network
2.) If you don’t remember if you have created a Sony Entertainment Network account in the past, you can enter your information and Sony will check for you. If you have an account with Sony’s PlayMemories Store or for PlayStation Network, you will then see this error message.
 Source: Sony Entertainment Network
3.) Login to the PlayMemories App website.
 Source: Sony Entertainment Network
4.) Find and select the Time-lapse App from the market. Once you have selected the app, you can buy it by choosing the ‘Proceed to Purchase’ button.
 Source: Sony Entertainment Network
5.) When you select the ‘Proceed to Purchase’ button, a notice will pop up of Sony’s terms and conditions informing you that you can install the application on up to 10 compatible cameras after you have purchased it. Select ‘OK’ to continue.
 Source: Sony Entertainment Network
6.) At this point, you will have to connect your camera to your computer via the included USB cable, and then press the ‘Verify Connection’ button.
 Source: Sony Entertainment Network
7.) Once you hit the ‘Verify Connection’ button, you will be notified that your computer is verifying the connection between your computer and camera. As your computer verifies the connection, you will see the wheel spin like this.
 Source: Sony Entertainment Network
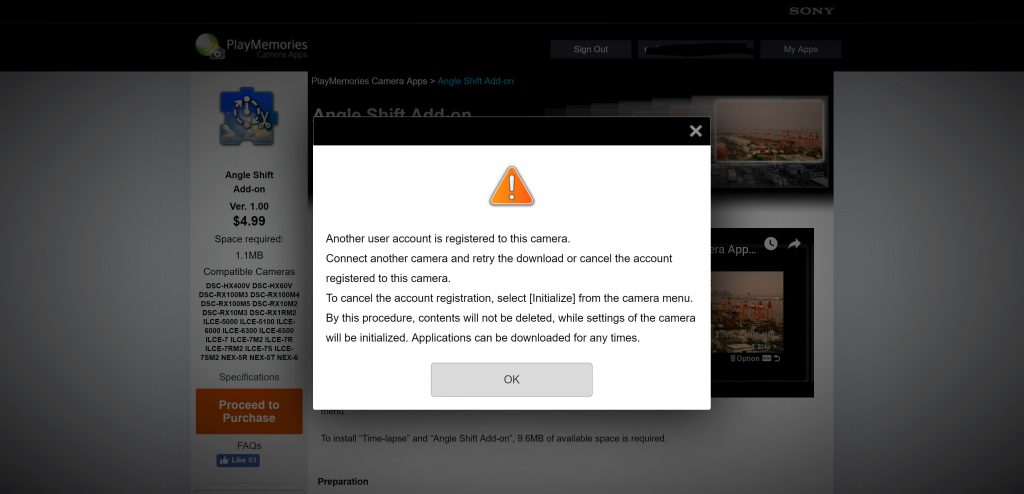
8.) If your camera is already associated with another Sony Account, you will get this error message letting you know. You will have to cancel the account already registered to this camera to continue with the installation.
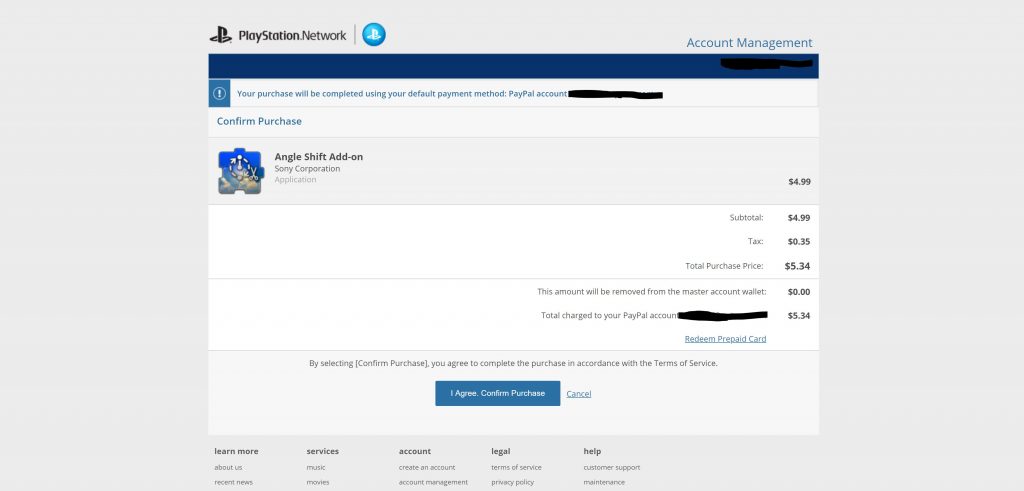
9.) Once your computer makes the connection to your camera, you will be brought to the payment screen to confirm your purchase of the app. In this screenshot, you are seeing the purchase of the Angle Shift Add-on because I had already installed the time-lapse app on the camera.
 Source: Sony Entertainment Network
10.) After hitting ‘Confirm Purchase’, you will be brought to this screen. Hit ‘Continue’.
 Source: Sony Entertainment Network
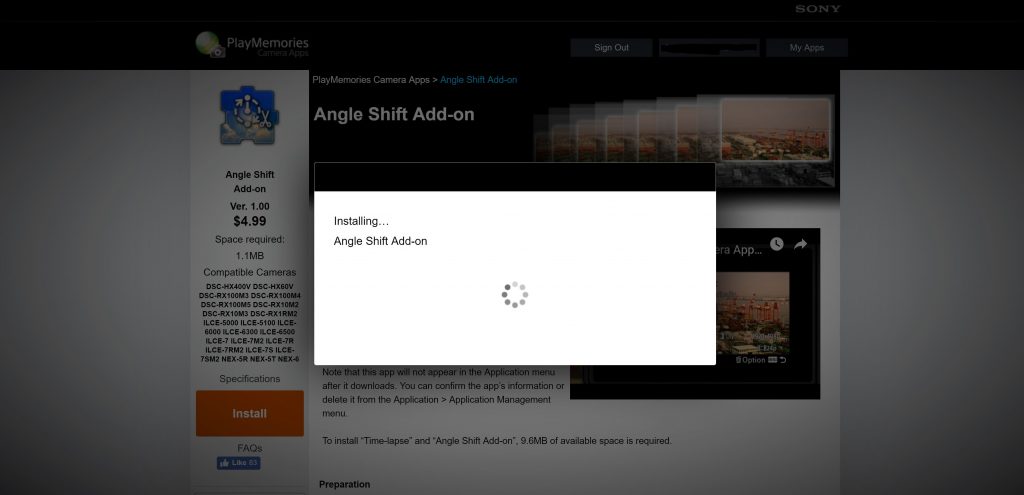
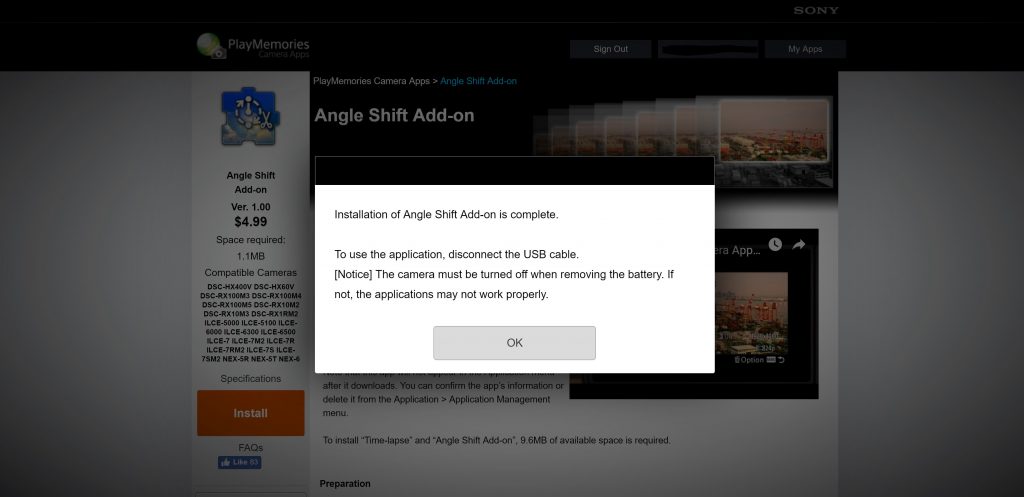
11.) Once you hit continue, you will be notified that the app is downloading and installing it to your camera. When the app is done installing, a message will pop up saying you can disconnect the USB cable now.
 Source: Sony Entertainment Network
 Source: Sony Entertainment Network
12.) Congrats! You have just installed the PlayMemories Time-lapse app on your camera and can now use it whenever you want by going to the application menu. This is located on the 4th tab from the right. Once you are on this tab, click ‘Application List’ and you will see the app.
How to Set Up and Shoot a Time Lapse
Now that you have the PlayMemories Time-lapse app installed on your camera, you’re almost ready to get out and shoot some epic time-lapses.
The next step is to learn how the app works and the good thing is that it is very intuitive to both setup and use.
The app has 5 different menu tabs to select settings for your time-lapse.
The most important menus out of the 5 different tabs are the ‘Application Top’ and ‘Application Settings’ menu so I’ll go over those first and then we will get into what the other settings are for.
Application Top Menu – Theme Selection

When you enter the time-lapse app, this is the first menu you will see. Here you can select which theme you want to shoot your time-lapse with. The different themes work very well, so I will usually pick one of these when I can.
If you want to navigate to this menu from any other place in the time-lapse app, select menu tab 1 –> application top. The only time I won’t use a theme is if I know the lighting conditions won’t change much and I want to keep the same interval between shots.
A good example of this is if I want to shoot a time-lapse of moving traffic or people at a slow shutter speed to capture the motion blur during the day. In total there are 8 different themes to choose from and for each theme, the camera will automatically adjust the shutter speed and aperture throughout the time-lapse based on the light the camera senses.
- Cloudy Sky – Shoots a scene of dynamically flowing clouds.
- Night Sky – Shoots the movement of stars.
- Night Scene – Shoots the lights of the city at night, including the lights of cars moving on the streets and movement of people.
- Sunset – Shoots the brightness of the setting sun and the dramatic color changes of the scene.
- Sunrise – Shoots the brightness of the rising sun and the dramatic color changes of the scene.
- Miniature – Uses the miniature effect to shoot people and cars rhythmically.
- Standard – Shoots with standard settings.
- Custom – Customize your settings and set the aperture, shutter speed, and ISO you want to use.
Application Settings Menu

After you have selected which theme you want to use or if you want to customize the shutter speed and aperture yourself, it’s time to choose the actual settings of the time-lapse such as interval between shots and the number of shots you want to take.
To get to this menu, you can either press the trash can button in the application top menu or you can go to menu tab 1 –> Application Settings.
Here are the different choices you have in this menu:
- File Format – This is where you choose your file format. You can choose an AVI movie file, images, or both. I always choose to shoot my time-lapses in images as I like to edit my images in Adobe Lightroom before creating the final time-lapse. The good thing about choosing an AVI file format is that you’ll be able to view and use your time-lapse right after shooting it. NOTE: The selection on this screen does not determine if your images are shot in RAW or the frame rate of your AVI video. This is selected on tab 2 of the menu.
- Interval – This is where you choose the time interval between each shot. You can choose an interval between 1 second and 60 seconds.
- Shots – The number of total shots in your time-lapse. I always like to set the number of shots higher than what I think I need. You can stop the time-lapse whenever you want by hitting the ‘menu’ button during the time-lapse
- AE (Lock AEL) – Allows you to lock exposure level based on the settings of the first shot.
- AE (Tracking Lo, Mid, Hi) – Allows you to set how fast the camera adapts its exposure settings based on the brightness levels of the scene you’re shooting at that time. The Lo, Mid, Hi, selection is how sensitive the camera is to these changes. Usually, I will leave this on the ‘Tracking Lo’ setting.
Once you have selected your theme and have selected the settings in the ‘Application Settings Menu’, it’s time to go through each menu tab to refine your settings a little further before starting the time-lapse.
Menu Tab 1

- Exit Application: no use at this point, but it is how you would exit the app once you are done.
- Application Top: This is where you access the theme selection menu that we went over already.
- Application Settings: This is where you access the Application Settings menu that we went over already.
- Self-timer: Allows you to choose between a 2-second delay or no delay after you press the shutter button to start the time-lapse. I like to have this on a 2-second delay to help minimize the impact of camera shake from pressing the shutter button.
- Interval Priority: If you turn this on, you will shoot at the same time interval throughout the entire time-lapse. If you turn this off, the camera will default to its auto adjusted shutter speed if it’s longer than the interval you originally set.
- Angle Shift Add-on: You have to purchase this add-on separately from the time-lapse app. If you have purchased it, this allows you to add a pan, tilt or other effects to your time-lapse after you have shot it in-camera. Once you have added the effect, the camera will save your time-lapse as a video file with the effect added to it. Note: The Angle Shift effects will only work on still images, so to use this option you have to shoot your time-lapse in image format or AVI + image format. I usually like to add in these effects using Adobe Premiere Pro, but if you don’t have that software, this would be a good substitute to use.
Menu Tab 2

- Image Size: I always leave this on L size to get the highest quality image for the time-lapse. However, if you’re worried about space on your memory card, you can also change the image size to M or S and even VGA if you want a low-resolution small file size.
- Aspect Ratio: You can choose an aspect ratio of 3:2, 16:9, or 4:3. I always shoot in 3:2 but choose the best aspect ratio for what you’re shooting for. Keep in mind that if you shoot only in Jpeg, the camera will crop your image to that aspect ratio and you won’t be able to retrieve what was cropped in post-production. If you shoot in RAW, you can still crop to another aspect ratio in post if you want.
- Quality: For the quality of the image, you can choose RAW, RAW & JPEG, Extra Fine, Fine, and Standard. I always shoot on RAW or RAW & JPEG as I edit the time-lapse images in Adobe Lightroom before converting it into a video in Adobe Premiere Pro.
- Frame Rate: For frame rate, you can choose 24p or 30p. This is only applicable if you choose a video format for your time-lapse.
- Movie Size: For movie size, you can choose 1920×1080 or 1280×720. I would leave this on 1920×1080 for the highest resolution possible, but if you want to save memory you can choose the latter. Again, this is only available if you choose a video format for your time-lapse.
Menu Tab 3

- Focus Mode: The choices here are auto focus single (AF-S), which uses the camera’s auto focus, direct manual focus (DMF), which allows you to manually adjust focus after first autofocusing and manual focus (MF), which allows you to manually focus from the get go.
- Focus Area: You can choose a Wide, Center, or Flexible Spot focus area. For the most part, I have it on Wide, but you can change this up based on what you’re shooting.
- Exposure Compensation: For automatic themes such as sunrise, sunset, night scene, etc. you can choose exposure compensation. You are not able to for a custom time-lapse theme. I usually leave this as is at 0 even when I have the choice.
- ISO: You can manually adjust the ISO when you choose custom time-lapse theme. For the other themes, the camera will be on auto ISO.
Menu Tab 4

- White Balance: This menu item is only available if you choose the custom time-lapse theme. Regardless, I usually don’t change this setting even if I have the choice to.
- Creative Style: Here you can use one of the built-in creative styles that Sony has in its cameras. This includes styles like vivid, neutral, clear, deep, portrait, etc. This is only available if you choose a custom time-lapse theme and I never use this setting.
- Picture Effect: This setting is only available if you shoot in Jpeg. Here you can choose to use one of Sony camera’s picture effects such as Toy Camera, Pop, Retro, etc. I never use this setting.
Menu Tab 5

- Focus Magnifier: This is by far one of the most important things to check before you start your time-lapse. When you hit this setting, you will be able to manually zoom in and adjust the focus of your image. The last thing you want to happen is to find out your image or video was out of focus after shooting it.
- Monitor Bright. during Shoot: This setting allows you to Dim the screen during the time-lapse which will save battery life. The battery isn’t the best with this camera so it’s important to check this before shooting your time-lapse
- Test Shot Func by Trash Can Button: By turning this setting to ‘On’ you can use the trash can button to take a test shot. I always have this ‘On’ so I can check what the image will look like before starting the full time-lapse.
Now that you have gone through all the menus and have selected the best settings for your time-lapse its time to hit that shutter button to create your first one! The one thing to remember while your camera is firing away is to make sure to keep it stable and to not touch it.
Also remember that if you want to stop the time-lapse before it has reached the shot count that you set at the beginning, just hit the menu button!
Editing and Post Production of the Time Lapse
As I mentioned before, I shoot all my time-lapses as images in RAW image quality.
Then I import all the images to Adobe Lightroom to edit the photos before using Adobe Premiere Pro to stitch the images together to create the time-lapse video.
It’s more time consuming than shooting a time-lapse video straight in-camera, but it’s really not too complicated to do and you get better quality. If you choose to shoot the entire time-lapse in the camera, the AVI video resolution is only 1080p compared to a 4k video if you shot the time-lapse as images and then stitched it together.
In addition, by shooting the time-lapse in RAW you will have full control over what the final images in the time-lapse look like.
For example, if parts of your time-lapse are over or underexposed, you will be able to adjust that in post pretty easily.
On the other hand, if you choose to shoot in Jpeg or AVI video, what you get out of the camera is pretty much what your final time-lapse will look like.
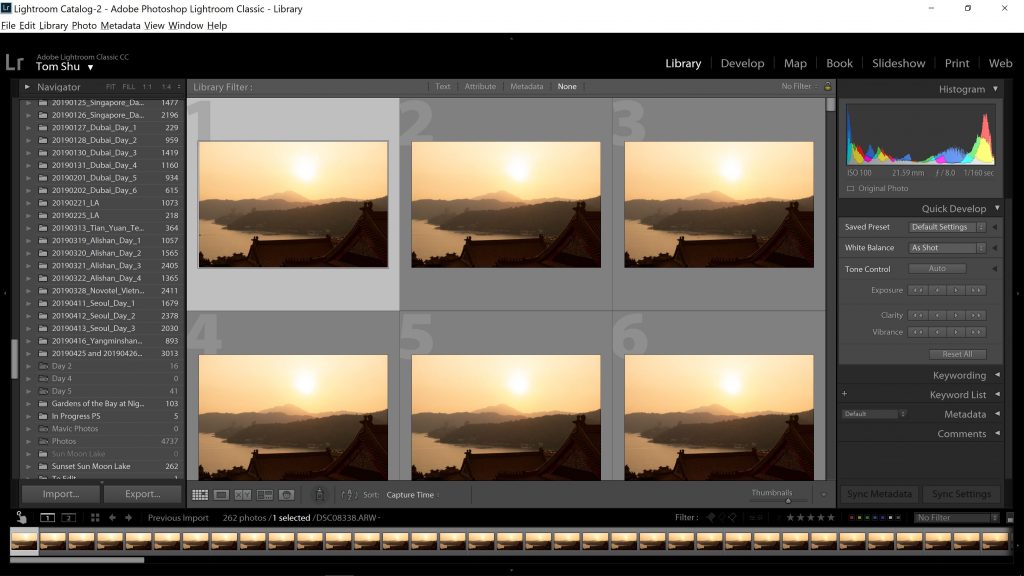
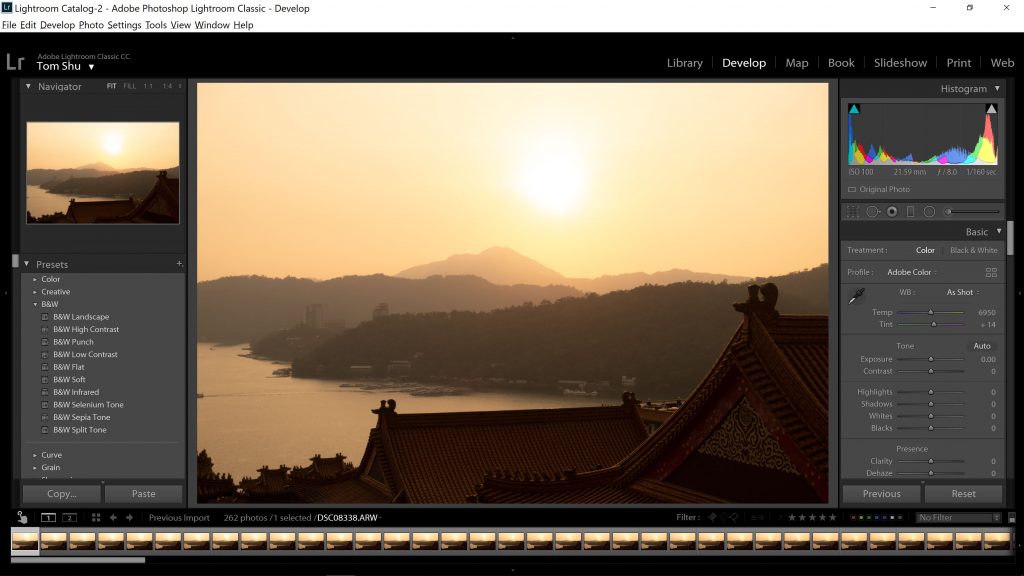
Anyways, here is the workflow I follow to create all my time-lapses. The example time-lapse that I’m going to walk you through was shot during sunset at Sun Moon Lake in Taiwan using the sunset theme of the time lapse app.
Editing Your Images in Adobe Lightroom
1.) Import the images you took for your time-lapse into Adobe Lightroom

2.) Once your images are imported, select the first image you want the time-lapse to begin with and edit it to your liking in the Develop tab.
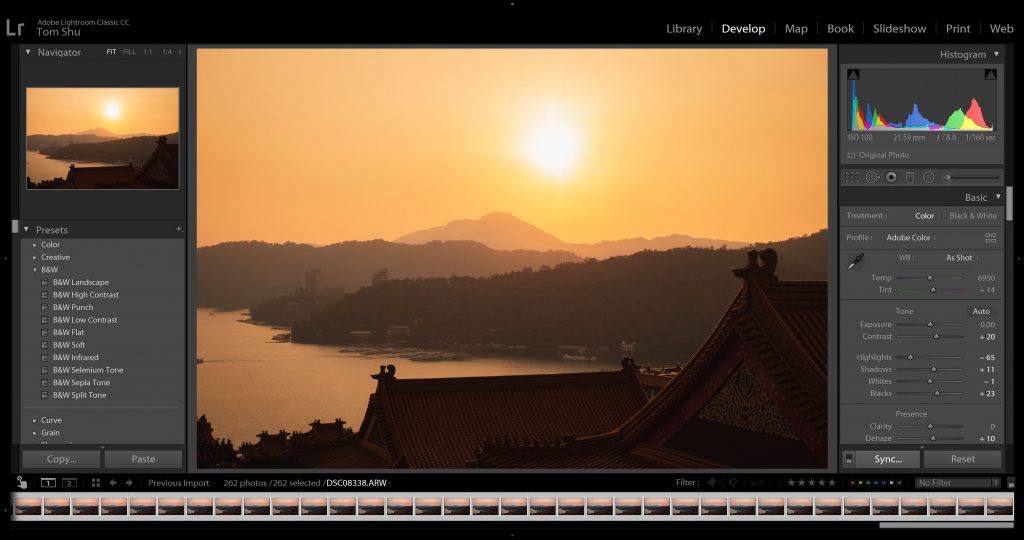
3.) Once you have the first image edited to your liking, highlight all the images in the bottom timeline.

4.) After you have selected all the other images in the timeline, hit the ‘Sync’ button in the bottom right-hand corner. This will bring up the ‘Synchronize Settings’ dialog box, which will allow you to sync all the edits you made in the first image to the rest of the images. In the dialog box, you can choose specific settings you want to sync across the other images. Once you select the settings you want and hit the synchronize button, the rest of your images will sync to the edits of the first image. Here are the settings I usually choose to synchronize.

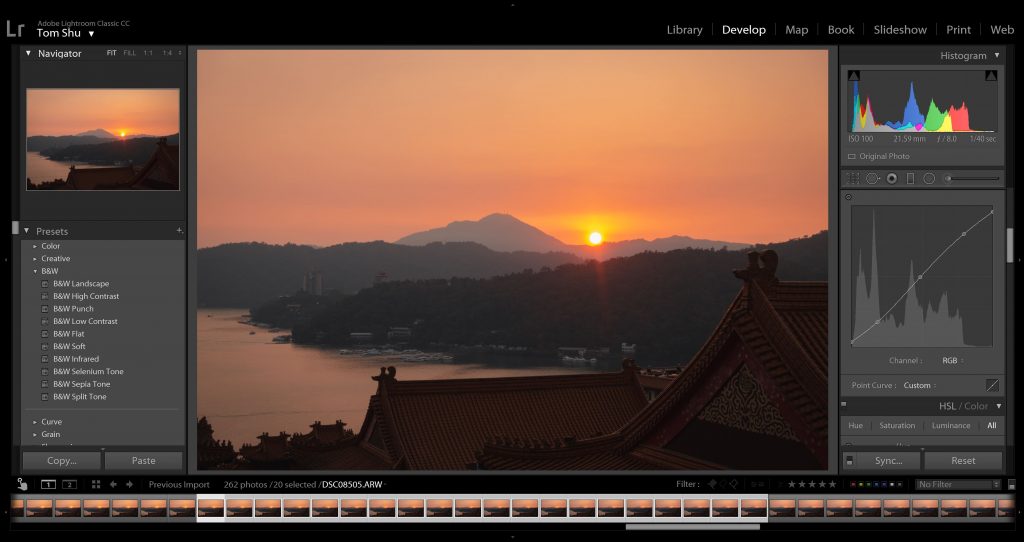
5.) Go through your timeline and specifically pay attention to the moments during the time-lapse that the lighting conditions have changed to make sure the synchronized settings are consistent. This is especially important during sunrise and sunset time-lapses when the sun is at a different place in the sky compared to when you first started the time-lapse.
If you notice certain sections of your time-lapse that are not consistent, adjust the first image of the section you want to adjust and synchronize the settings throughout that section. The settings will sync based on the first image you select, not based on the first image in the timeline.
For example, if you notice that in the section of your time-lapse when the sun disappears under the horizon and the image is underexposed, then you can edit the first image in the section and synchronize the settings across the rest of the section.
This way you don’t have to edit each image in a certain section individually.
6.) Once you’re happy with how all settings have synced and how the edited images look, it’s time to export the photos. The first step in exporting the photos is to select all the images in the bottom timeline.
7.) After you have selected all the images in your timeline, go to File –> Export or hit Ctrl + Shift + E on a Windows computer to bring up the export dialog box.
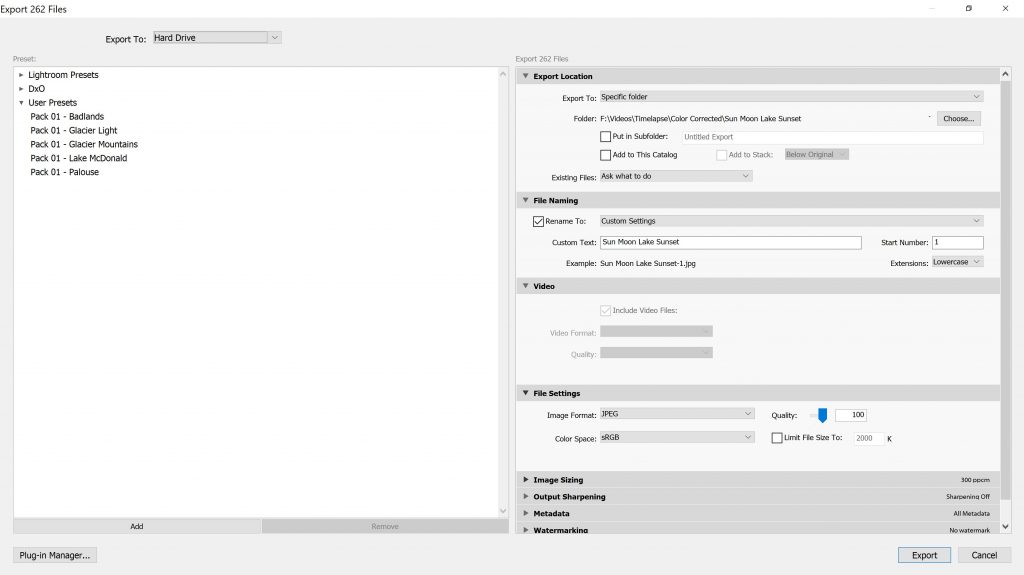
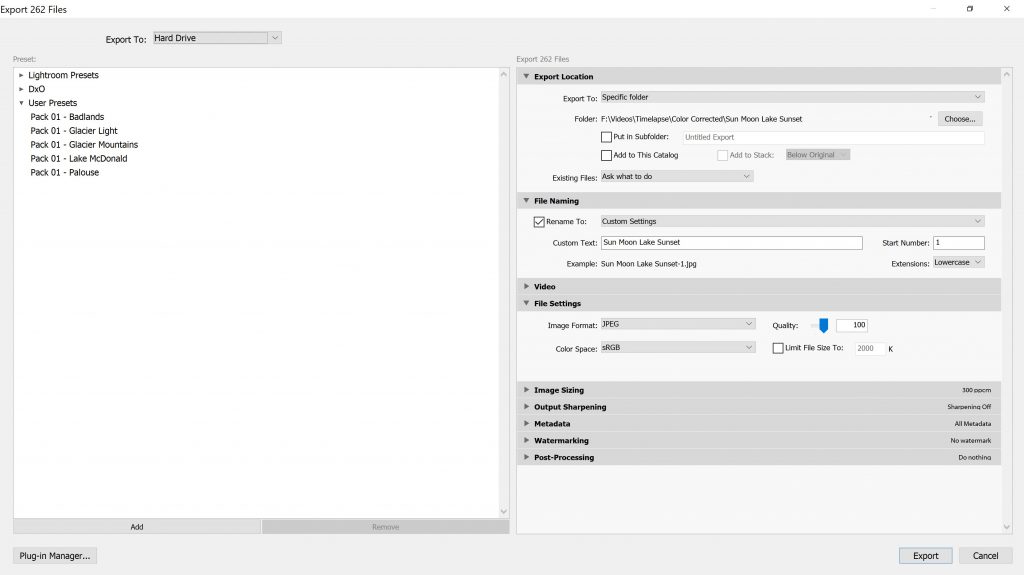
8.) Within the dialog box, I only change the Export Location, File Naming, and File Settings. Here is what I do in each section.
- Export Location: I like to save my final edited images onto an external hard drive, but you can select any folder you want to.
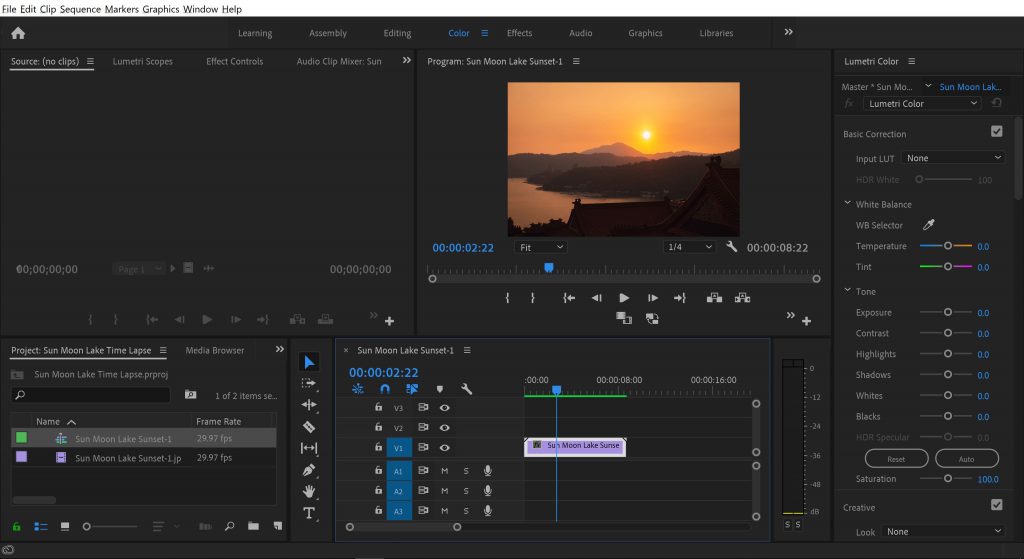
- File Naming (Important): Make sure you select ‘Rename to’ and choose a setting that allows you to number each image sequentially. For example, in my case, the files that are exported will be Sun Moon Lake Sunset-1.jpg, Sun Moon Lake Sunset-2.jpg, Sun Moon Lake Sunset-3.jpg, etc. You need to number it sequentially like this to import the images as a video in Adobe Premiere Pro, which is the next step.
- File Settings: For file settings, I export the image as a JPEG at full 100 quality with color space of sRGB.
9.) Hit the Export button to start the export process. You will see an export status bar in the top left corner of your Adobe Lightroom at this point. Once all of your images have been exported its time to move onto the next section and import your time-lapse to Adobe Premiere Pro.

Importing Your Images Into a Video with Adobe Premiere Pro
The hard part of creating the time-lapse is over now. All we have to do at this point is to import the images into Adobe Premiere Pro and the software will stitch the images together into a video.
Then from that point, we can add music and any effects you like to the time-lapse and finally export it into a video!
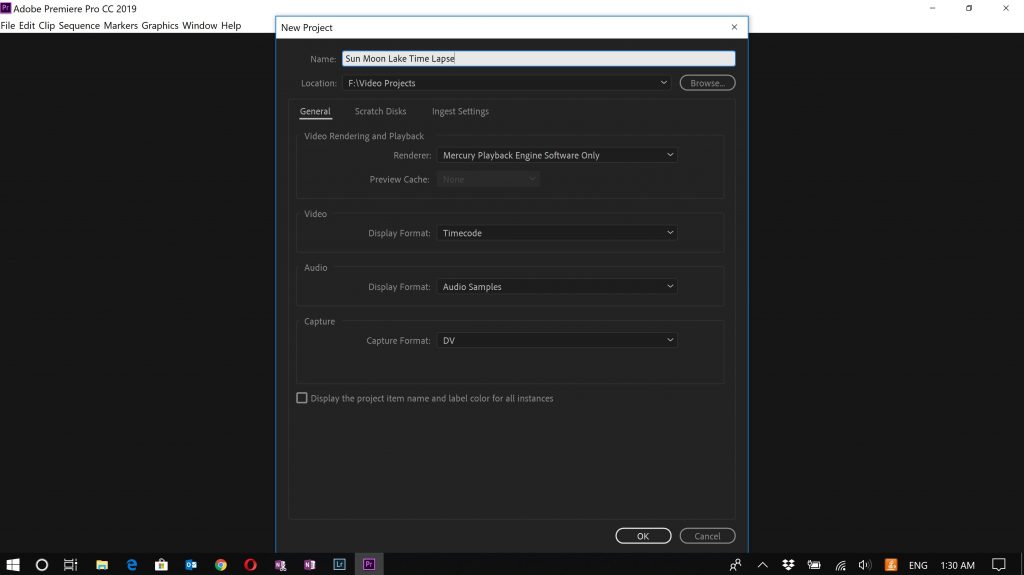
1.) Open up Adobe Premiere Pro and create a new project.
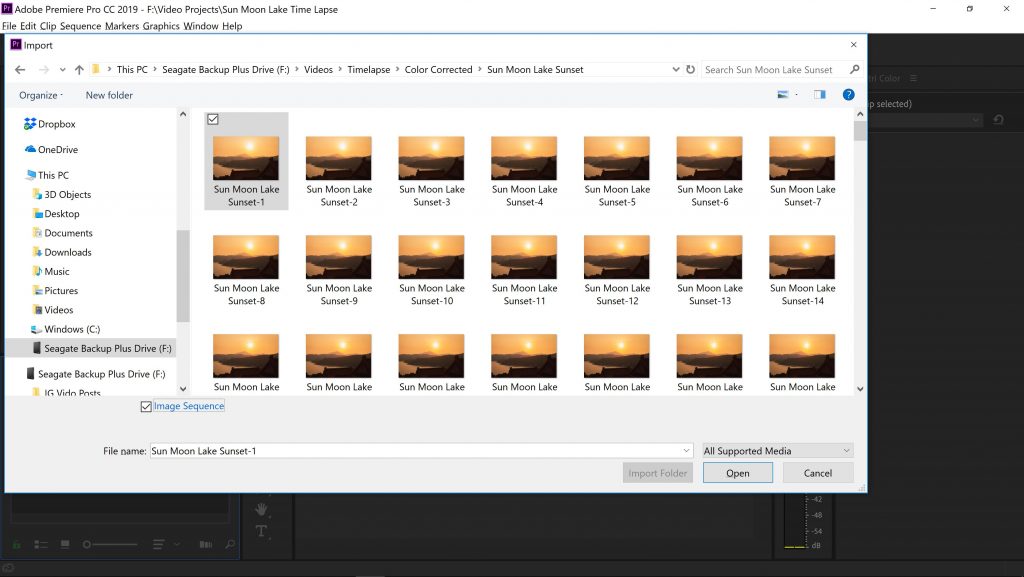
2.) Once you have your project opened up, click on import media in the bottom left-hand corner to bring up the import media dialog box. I have my workspace set to default so your import selection could be in another area of your project.

3.) Navigate to the folder where your time-lapse images exported to. Now, select the first image (in my case it’s Sun Moon Lake Sunset-1) and select the ‘Image Sequence’ checkbox which is right below the file browser on the bottom left. This will import your images as a sequence of images in Adobe Premiere Pro and by doing so will create a video.
4.) Once you have imported your image sequence, you will now see a JPEG file in your project folder. This is your completed time-lapse!

5.) Now, move the JPEG file into the timeline to create your time-lapse sequence and view what you have created!
From here, you can also add music to your time-lapse, speed it up, or even add a digital zoom effect to it. I won’t get into these additional things in this article, but here is one of my favorite YouTube videos on how to add a digital dolly zoom effect using Adobe Premiere Pro.
6.) Once you have your time-lapse the way you want it, set the in and out points by pressing ‘I’ at the beginning point of the video and ‘O’ at the place where you want the video to end. Then go to File –> Export –> Export Media or CTRL + M on a windows computer to bring up the export media dialog box.

7.) Here is what I usually select for export settings for the time-lapses that I create. For any setting I didn’t mention, I just leave as is.
- Format: H.264
- Preset: YouTube 2160p 4k Ultra HD
- Match Source: Make sure to hit ‘Match Source’
- Render at Maximum Depth: Make sure to select ‘Render at Maximum Depth
- Encoding Settings (Performance): Software Encoding
- Bitrate Encoding: VBR, 2 pass
- Target Bitrate: 25 for 1080p; 50 for 4k
- Maximum Bitrate: 35 for 1080p; 70 for 4k
- Maximum Render Quality: Make sure to select ‘Maximum Render Quality
Example Time Lapses Shot with the RX100 V
Now that you know how to download the app onto your camera and set it up to shoot your time-lapse, I thought it would be good to show you just how capable the little RX100 V is with shooting time-lapses in any situation you throw at it!
Here is a compilation of the different time lapses I have shot with this camera during my travels to Taiwan, Singapore, and China.
I have also included what time-lapse theme I used to shoot each time-lapse to show you how good and how flexible each theme is.
Time Lapses in the Compilation
1.) Sunset at Sun Moon Lake in Taiwan
- Time Lapse Theme Used: Sunset
- Number of Shots: 262
2.) Super Trees at Gardens of the Bay, Singapore
- Time Lapse Theme Used: Night Scene
- Number of Shots: 103
3.) Morning at West Lake in Hangzhou, China
- Time Lapse Theme Used: Custom. ISO 100; F11; Shutter Speed 2.5 sec
- Number of Shots: 125
4.) Blue Hour at West Lake in Hangzhou, China
- Time Lapse Theme Used: Sunset Scene
- Number of Shots: 181
5.) Sunset Over Bridge in Beigang, Taiwan
- Time Lapse Theme Used: Sunset
- Number of Shots: 244
6.) Matsu Festival Celebration in Beigang, Taiwan
- Time Lapse Theme Used: Custom. ISO 100; F5; Shutter Speed 1/15 sec
- Number of Shots: 649
Summary
The Sony RX100 V really is one of the most powerful compact cameras on the market and makes a versatile time-lapse making machine to your pack of gear.
My favorite thing about shooting time-lapses with this camera is just how small it is. This makes it easy to bring along and to set up once you’re at the shooting location.
Pair that with the Sony PlayMemories app and you have an extremely easy way to shoot time-lapses where ever you go in the world.
The only downside with the camera is the battery life.
Since it comes in such a small package, this is expected, but it is still something to watch out for when you go out and shoot time-lapses with this camera.
That’s all I have for you today and I hope you enjoyed this guide.
It would be awesome to see some of the time-lapses you end up shooting with this camera too so feel free to send them my way!
Very informative article. I’ve made one time lapse with my RX100v which worked well. But last night, I tried to capture a sunset with the Sunset setting. I did not try to customize any settings, just selected Sunset and clicked the shutter button. It took a picture every 10 seconds. After some time, it shut off. I thought it ran out of batter, but I think it just stopped because it took the predetermined amount of photos. I started the process again to capture more images and I stopped it after the sun set.
When I got home, none of the images were on the card. Coincidentally, my other time lapse photos were still there. And I tried a short time lapse at home using the same settings and every image was there.
Any ideas what I did wrong?
Mike
Edit to the above: I found the files. They were saved as an avi file. I didn’t think to check for that setting- assuming it was images when I heard the shutter clicking away. Live and learn.
All the best.
Hi Mike! Thanks for reading the article and I’m happy to hear that you found it informative. I thought that’s what might have happened and I’m glad you figured out that the timelapse saved as an avi file. I’ve done this so many times on accident it’s hard to count haha. Now I always make sure to triple check what settings I before starting the timelapse. Even then, just a couple weeks ago, I accidentally left the AEL lock on so most of the images in the timelapse were overexposed. Like you said, it’s a great learning experience everytime.
Can’t even get to the page on a PC to select the app – Sony is doing a very poor show here – the portal is so weak i’m just going to buy a third party intervalometer off of Amazon – shame, there were a few apps I would have purchased – guess Sony just don’t want my money.
That’s unfortunate to hear. Have you tried calling Sony’s customer support for help?
Affirmative. Sony doesn’t care about customers. Their application writing skills are poor.
I found the reason for this is that they’re putting many of the features found in the app directly in the camera.