

The Sony menu system can feel clunky at times when you’re looking for a specific setting.
To make it easier for you, I thought I’d throw together this quick guide to show you how to set up the audio settings on your a6500.
Here is what we’re going to be covering in this quick guide today:
- Where to find the audio settings in the camera menu.
- Pro Tip: Adding Audio Rec. Level to the custom/function menu.
- What audio level to use when recording.
- 5 tips for better audio in your video.
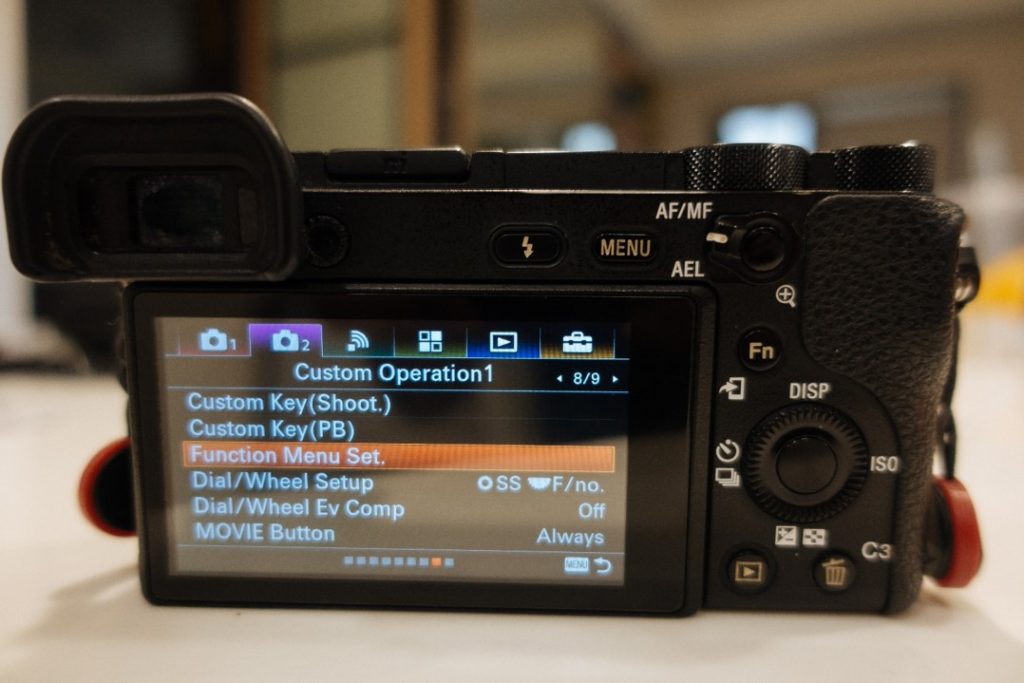
Where to Find the Audio Settings in the Camera Menu
The audio menu is located in the camera 2 tab, which is the camera icon with a purple background in submenu 2 of 9.
Note: To access the Audio Rec. Level setting, your camera needs to be on one of the video recording settings.
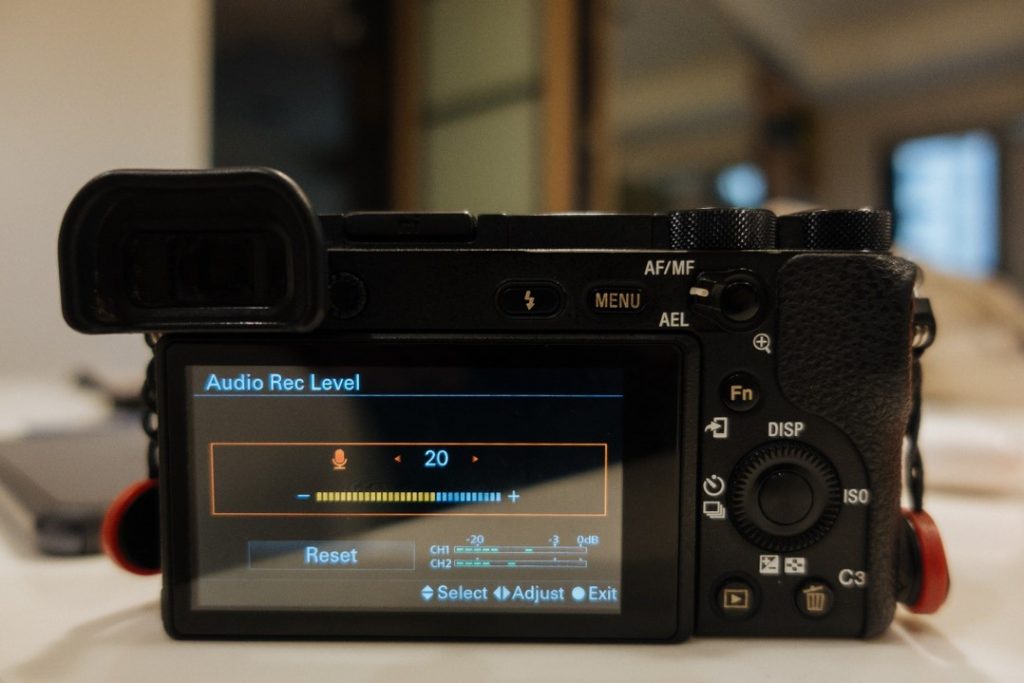
Here is what it looks like in the menu of your a6500.
1.) Turn the mode dial to movie mode or memory 1 / memory 2 if you have memory recall modes set to a video recording mode. If you haven’t and you want to set up memory 1 and memory 2 to recall your 4k or slow-motion video recording settings, here is our step by step article on how to do so.
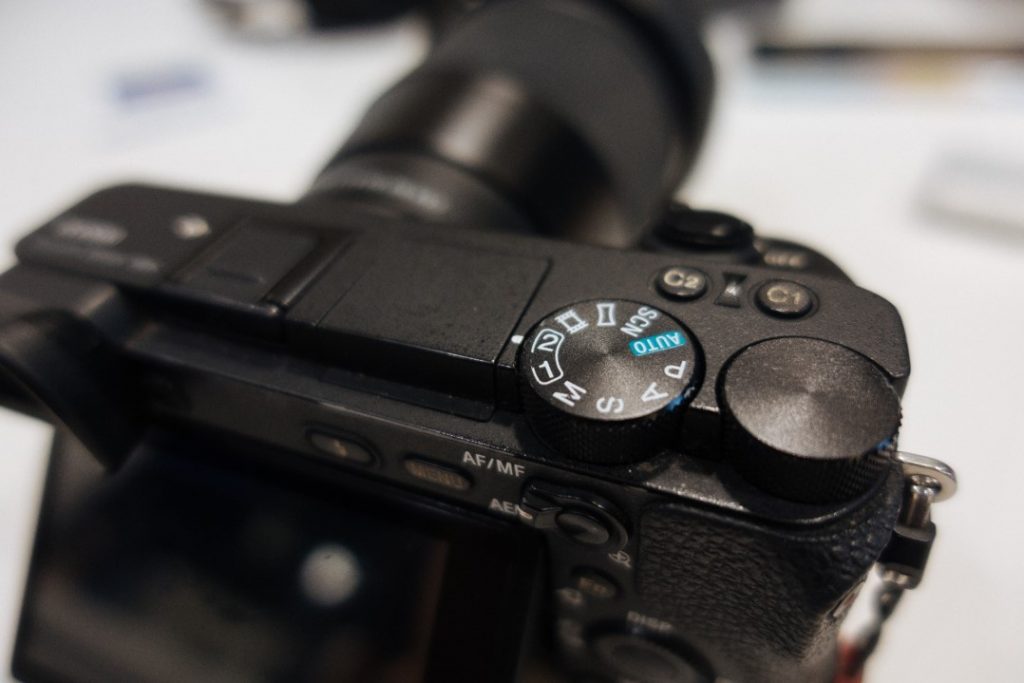
2.) Hit the menu button and navigate to the camera 2 tab. Once you are there, head to sub menu 2 of 9. Again, it looks like a camera icon with the number 2 to the right of it, and the background is purple.
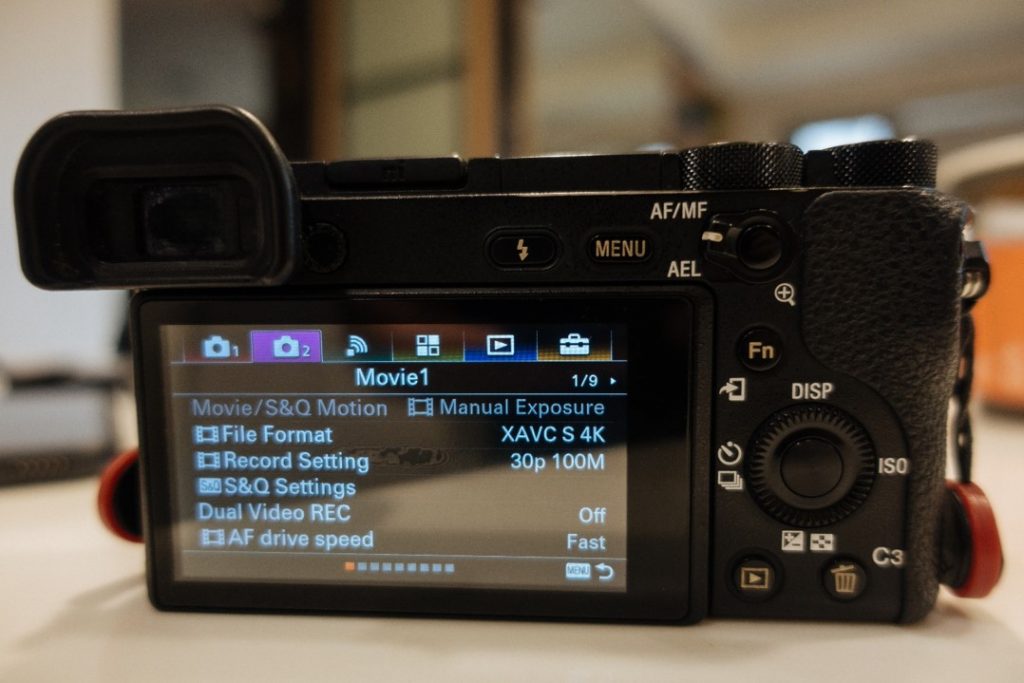
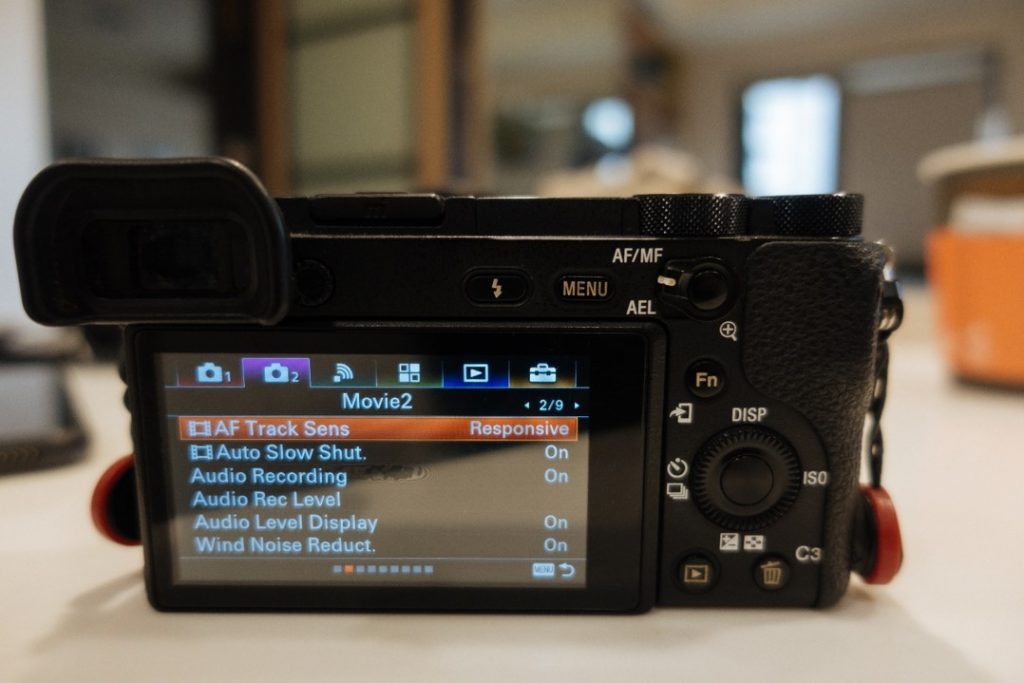
3.) Once you’re in submenu 2 of 9 you will see the audio settings you can change. These audio settings include:
- Audio Recording – allows you to turn on or off the ability for the camera to record audio either through its internal mic or an external mic.
- Audio Rec. Level – allows you to adjust the audio recording level based on what you are recording.
- Audio Level Display – gives you the option to turn on or off the display of the audio levels. If you turn it on, the audio level will be displayed on the screen in any video recording mode.
- Wind Noise Reduction – as the name suggests, turning this option on will reduce the interference from wind noise. I always leave this option on.
Pro Tip: Adding Audio Rec. Level Setting to a Custom Key or the Function Menu
The last thing you want to happen while out shooting is to have to spend time in the menu system, right? One of my favorite tips for the audio settings for the Sony a6500 is to add the Audio Rec. Level setting to your custom or function menu. This makes it much easier to increase and decrease the Audio Rec. Level while out shooting.
If you haven’t done this yet, it just takes a couple of steps to update it.
1.) Hit the menu button and navigate again to camera tab 2. Once you are there, navigate to submenu 8 of 9.
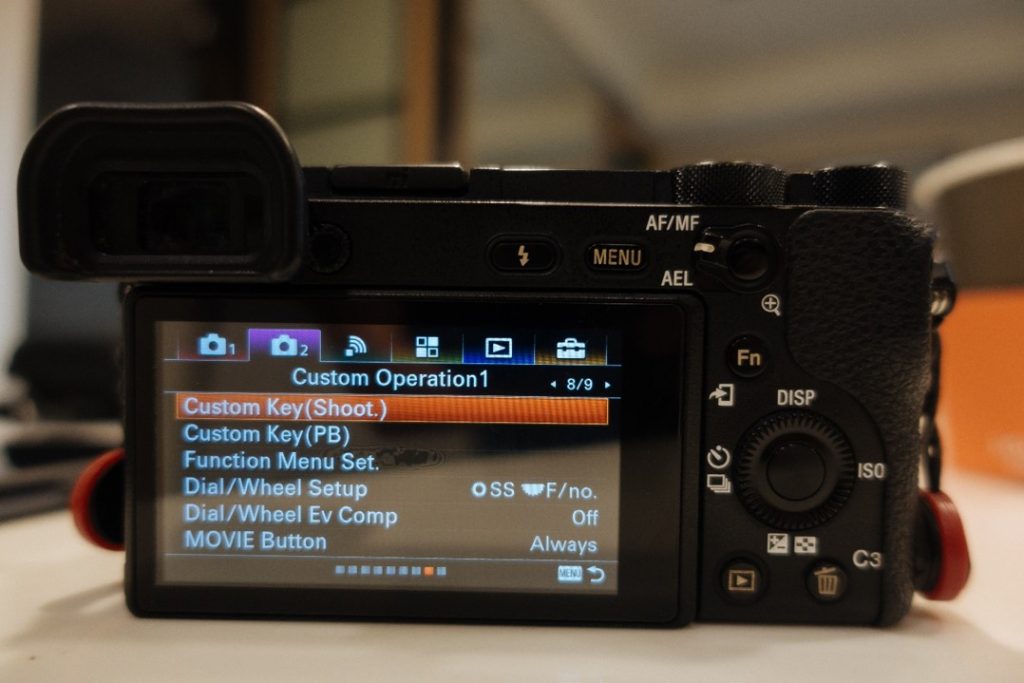
2.) Once you are in submenu 8 of 9 you can either choose to add the Audio Rec. Level setting to a Custom Key or one of the slots on the Function Menu. Let’s go over the custom key option first.
3a.) Custom Key (Shoot.) Option: Once you are in the Custom Key (Shoot.) menu, you will see all the custom key buttons that you can customize. Scroll and select the button you would like to customize with the Audio Rec. Level setting (In this case, I have selected the Left Button).
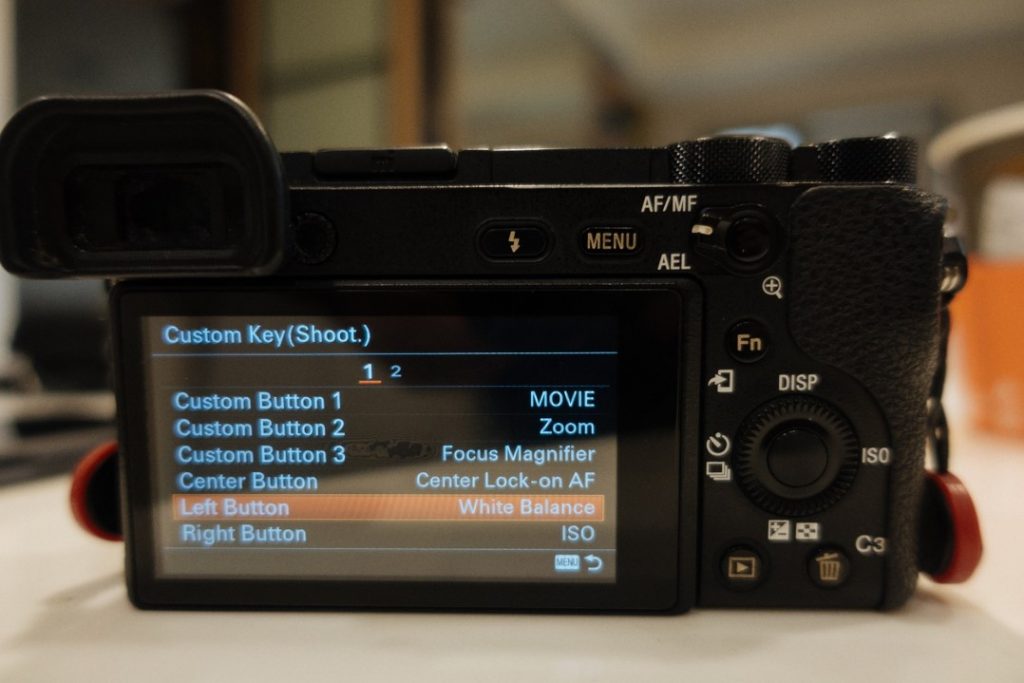
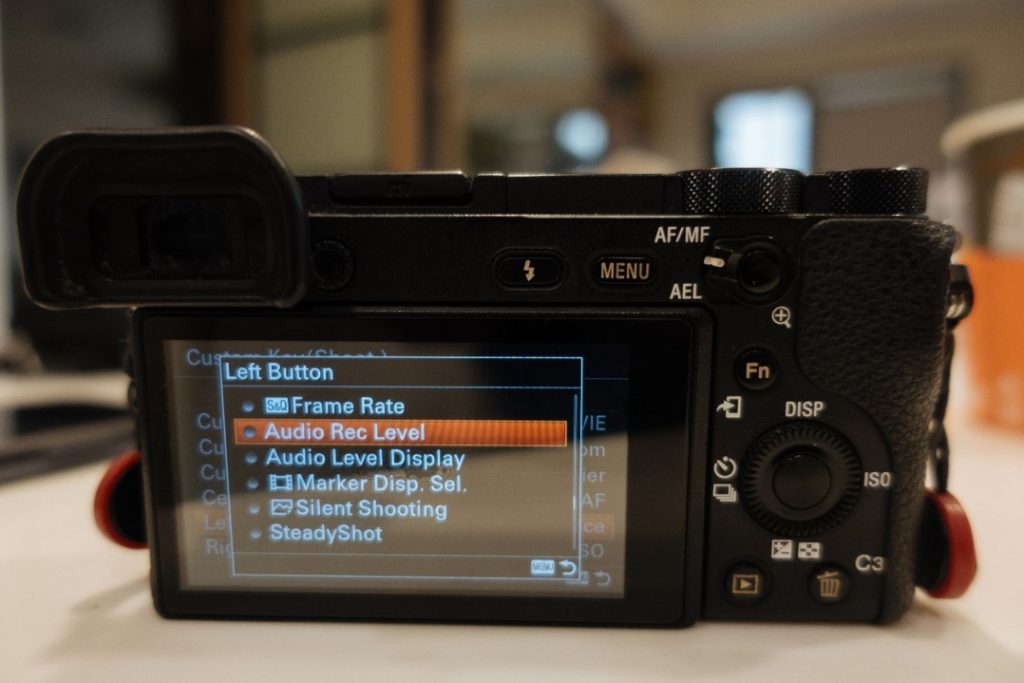
3b.) Once you select the button, a dialog menu will pop up. Find and select Audio Rec. Level, which is between S&Q Frame Rate and Audio Level Display and you have now customized that button.
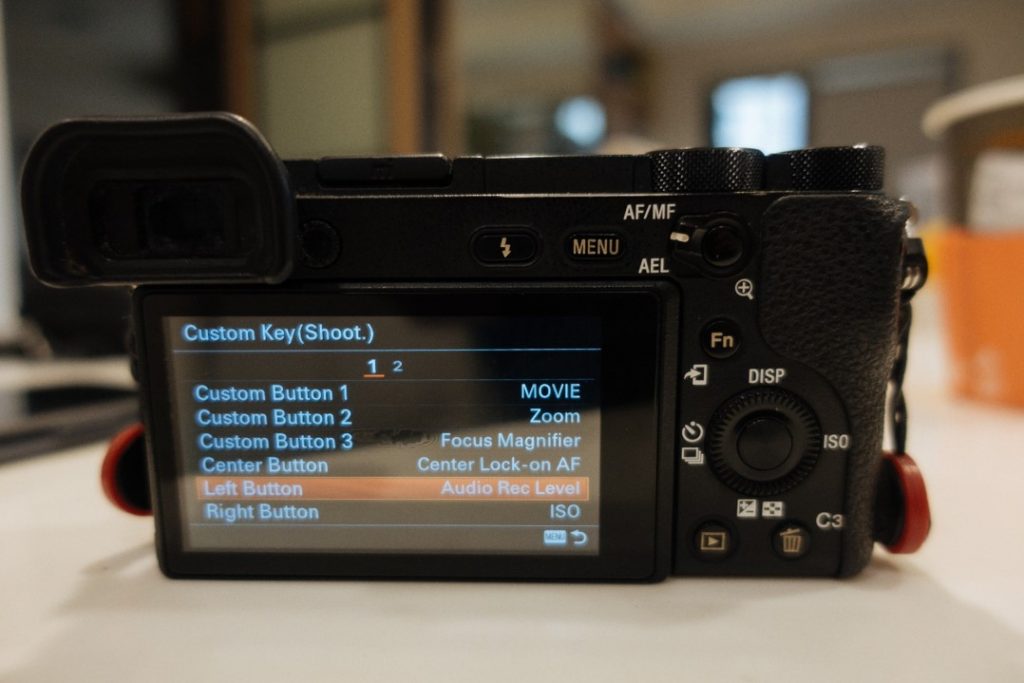
3c.) From now on all you have to do while you’re out shooting video is press that button to pull up the Audio Rec. Level setting menu.
4a.) Function Menu Option: Once you are in the Function Set Menu, you will see all the spaces available to add a new function to your function menu. Scroll and select one of the spaces you would like to designate for the Audio Rec. Level setting (In this case, I have selected Function Upper4).
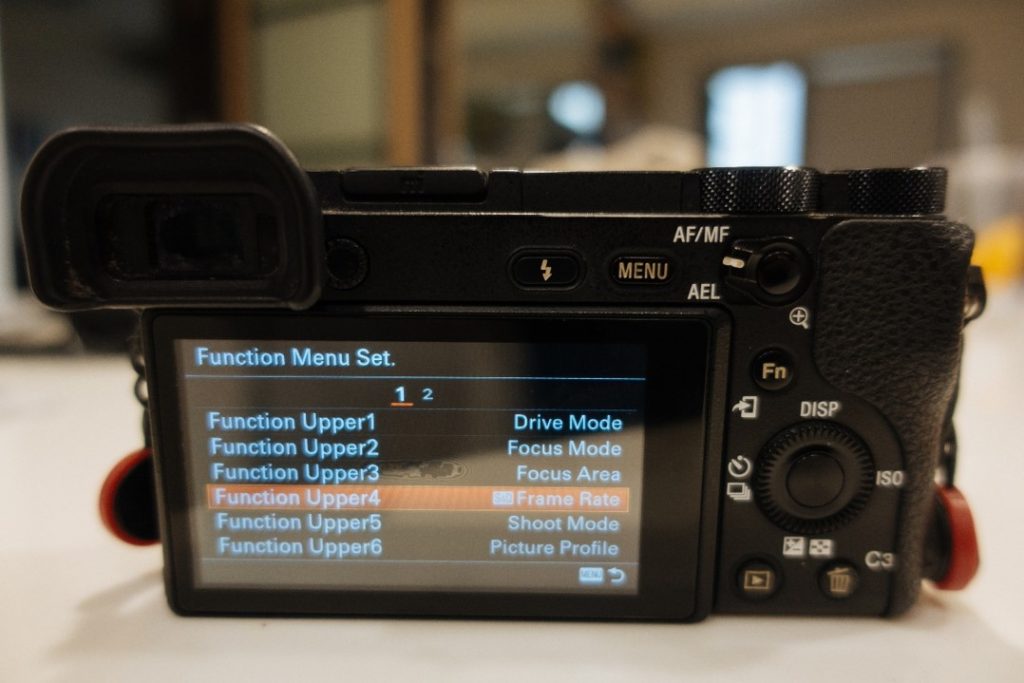
4b.) Once you select a space, a dialog menu will pop up. Find and select Audio Rec. Level, which is between S&Q Frame Rate and Audio Level Display, and you have now set that Function Menu space to the Audio Rec. Level setting.

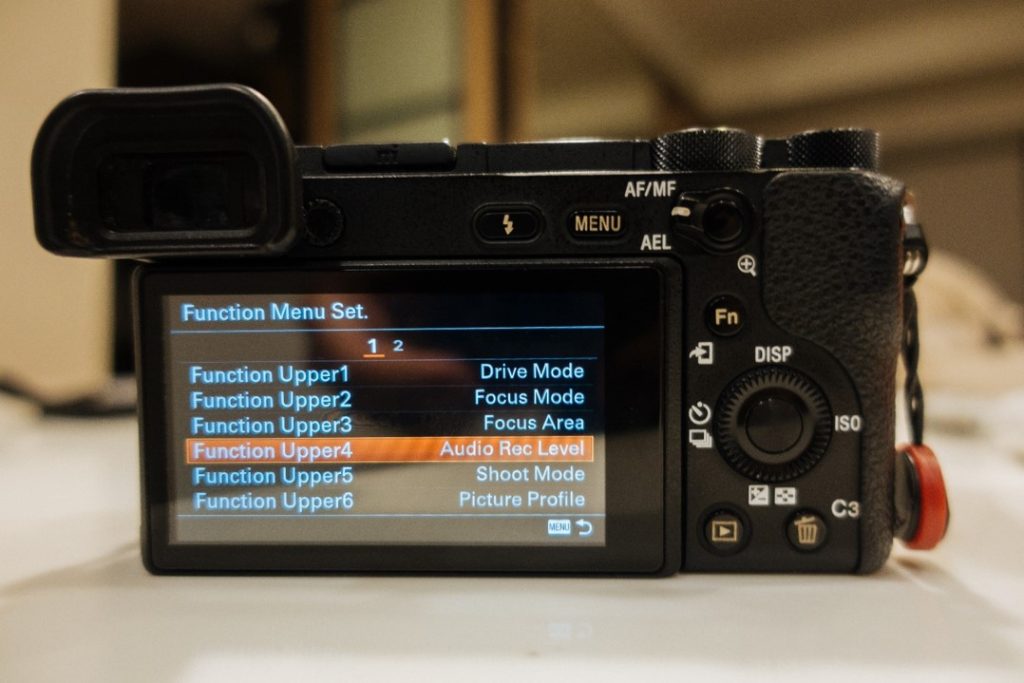
4c.) From now on all you have to do is hit your Function button (Fn button) and you will see the Audio Rec. Level function in the function menu for you to enter the Audio Rec. Level settings page.
5.) That’s it! Now you have easy access to the Audio Rec. Level setting when you are out shooting and can change it by just hitting a few buttons instead of going through the menu.
What Audio Level to Record at?
Unfortunately, there is no exact answer when it comes to what audio level to set your Audio Rec. Level setting to in-camera.
I’m not going to get into too much detail about audio recording in this article, but the most important thing to watch out for is to prevent your audio from peaking or blowing it out.
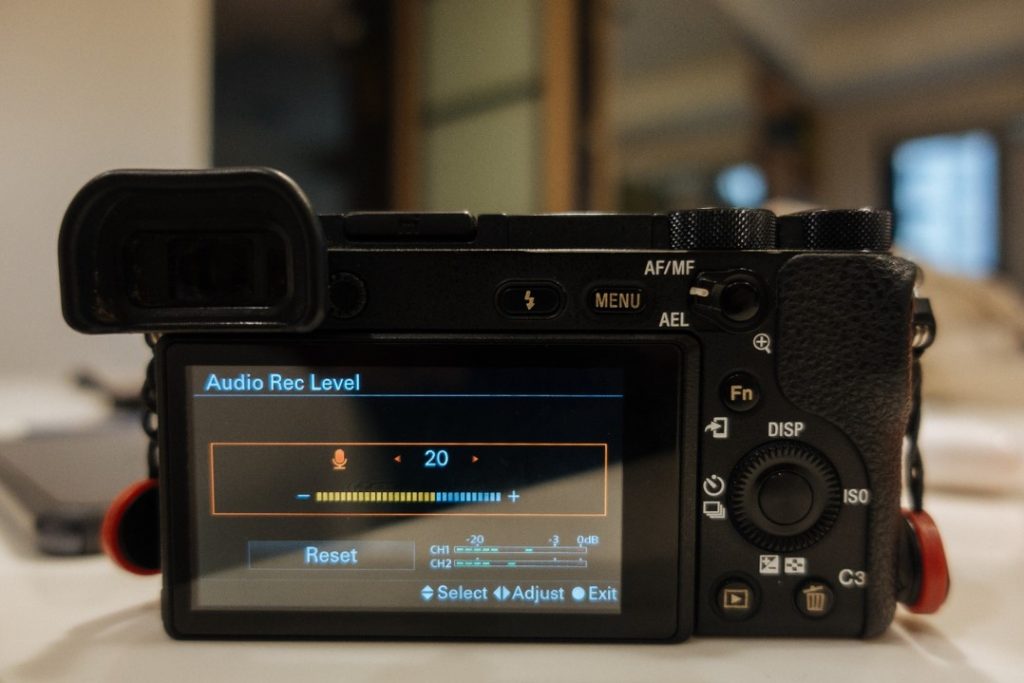
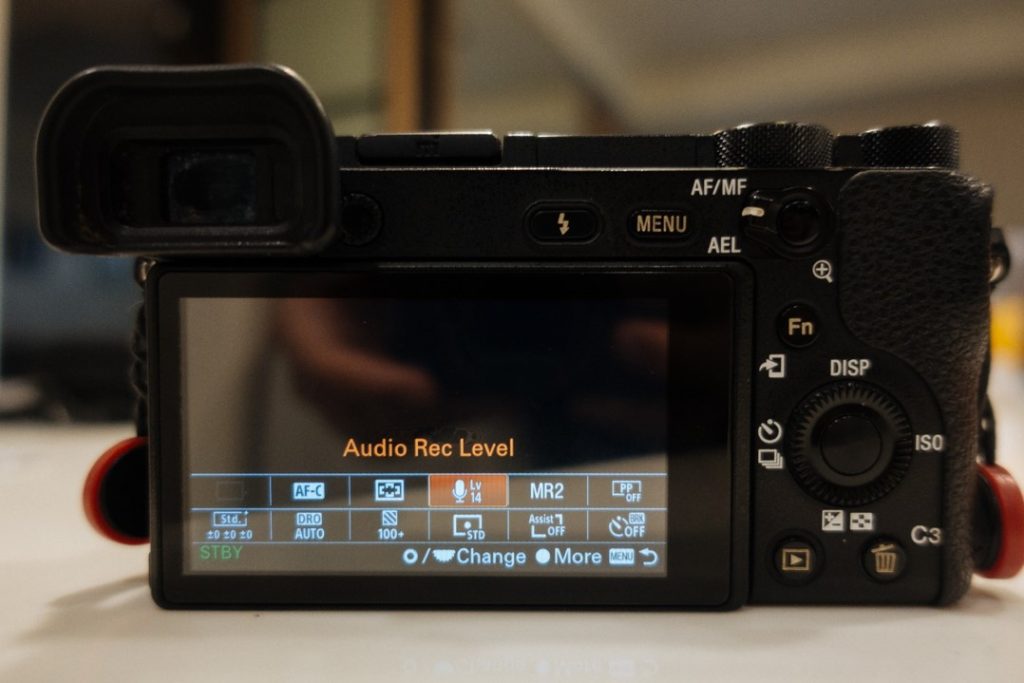
You can see if the audio you’re recording is peaking by referencing the Audio Level Display both on your camera screen or in the Audio Rec. Level menu.
When the CH1 or CH2 audio bar hits 0dB, which is also the red section, your audio has peaked/has blown out.
If you do this, it’s kind of like blowing out your highlights or shadows in photography. You can try to fix it in post, but if it goes beyond that level too much, you won’t be able to use it.
The camera’s default Audio Rec. Level is 26, but since every situation and a scene you’re shooting is different, you will have to adjust the level based on your environment.
To keep it simple, here is how I usually set my Audio Rec. Level.
- Make sure the Audio Level Display (also in camera tab 2, submenu 2 of 9) is turned on.
- Make sure to reference the CH1 and CH2 audio levels on the display while I’m out shooting at all times.
- Try my best to keep the audio levels in both channels bouncing in the middle of the bar.
- Adjust the Audio Rec. Level for the loudest noise in the environment. For example, if the scene I’m shooting is extremely loud like when we were shooting our short film Spirit of Matsu with fireworks exploding everywhere, then turn the Audio Rec. Level lower. On the other hand, if the environment is extremely quiet, then turn the levels higher.
5 Tips for Better Audio
I know when I first started out making videos, the last thing I focused on was the quality of the audio I was recording.
Over time I realized that audio was one of the most important parts of making a more cinematic video.
With that said, this doesn’t mean you have to buy the most expensive audio recording equipment to take your videos to the next level.
Here are a few tips based on my experience to get the most out of the a6500’s audio recording capabilities.
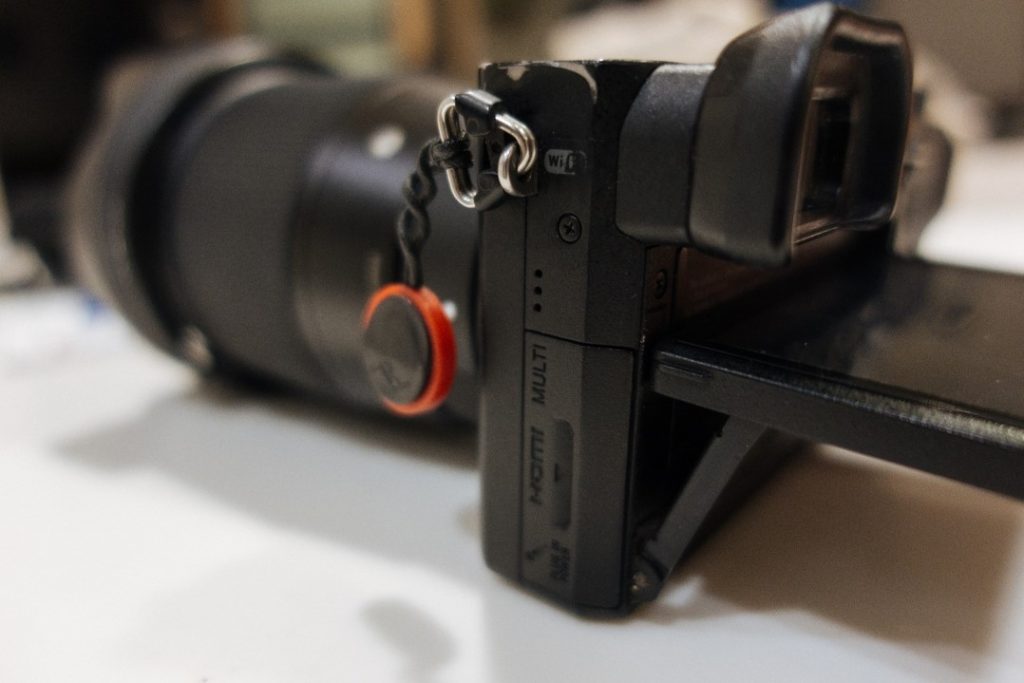
1.) The internal mic is located on the left side of the camera body right above the multi/USB terminal (picture below), so make sure you don’t block it with your hand. If it’s not windy out and the sound source is relatively close to your camera’s mic, you will get decent audio as the a6500’s internal mic is surprisingly good.
2.) To repeat, make sure you monitor the Audio Level Display to make sure your audio is not being blown out.
3.) If you choose to interpret your 60 FPS or 120 FPS slow-motion footage in post-production, the audio from what you recorded is also interpreted giving you a cool slow-motion sound effect. If you don’t know what interpreting your footage means, make sure to read our guide on shooting slow-motion video with the Sony a6500!
4.) Purchase an external mic for your camera. My favorite to use has been the Rode VideoMicro Compact On-Camera Microphone for its compact size, reasonable price, and of course the quality of the sound it records. There is no set up required for this mic. All you have to do is plug it into the Sony a6500’s mic input and you’re good to go.
5.) Don’t set it and forget it! Continually monitor your audio levels the entire time you are filming.
Summary
There you have it! My simple and straightforward guide to how I set up audio settings on the Sony a6500.
Although audio settings are one of the more boring topics to research, it does make a difference in your final video.
Now, you will know how to navigate to the audio settings in the camera and will know how to customize your custom buttons to access audio settings easier.
Out of everything I went over today, the most important thing to keep in mind when recording audio is to do everything you can to prevent your audio from peaking.
The other point I want you to remember is that the internal mic is of the a6500 is pretty decent, so don’t use that as an excuse for not trying to capture audio from whatever you are shooting.
What’s your opinion on the audio capabilities of the camera?