
As with all my Ultimate Guides, my goal with this ND filter review is to create the most comprehensive, well-researched article available to help you make a decision in finding the best ND filter for your workflow.
For this review, I tested and compared 7 different ND filters across 3 different price categories to figure out which are the best options for you.
Note: All of the filters tested were the 10 stop version of the respective ND filter, but it should also represent the performance of other stop versions of the same ND filter.
Here are the ND filters that I tested.
- Premium:
- Mid-Range:
- Budget:
To test these ND filters, I brought the ND filters on a week-long trip through Washington State and the Oregon Coast for in-field testing at 3 different locations. After the trip, I then set up a small test indoors to test the ND filters in an artificial environment.
By comparing these ND filter price categories against each other, my hope is to give you a better understanding of what to look for in an ND filter and which price category fits your workflow the best.
TLDR: The test results show premium ND filters are worth the investment and mid-range filters are usually the worst option.
My Pick
Kolari Pro ND
Kolari Vision, the company that makes the Kolari Pro ND is better known for its infrared photography equipment. However, they recently entered the consumer photography space and have created a very nice ND filter.
Overall, the Kolari Pro ND performed very well across a range of different environments, showed a consistent neutral color profile, has little to no vignetting and uses Gorilla Glass for extra durability.
PROS:
- Consistent performance across a variety of different environments.
- Shows little to no vignetting.
- Premium packaging and storage case.
- Built with Gorilla Glass for tough durability.
CONS:
- Premium ND filter might not be the best option for every photographer because of its much more expensive price point.
- Kolari just started offering ND filters so they’re not as well known.
Why I Like the Kolari Pro ND
Overall, the in-field testing and studio testing results confirm that premium ND filters are worth the more expensive price tag especially if you’re a serious photographer who wants the most consistent results in all situations.
Out of the 3 premium ND filters that I tested, the two most consistent performing ND filters were the Kolari Pro ND and the PolarPro Quartzline ND1000 Filter. On the performance side, both these filters showed a neutral color profile with little to no color cast, minimal vignetting, and had similar results at each location.
In the end, I found that I enjoyed using the Kolari Pro ND more because of its slimmer profile and the peace of mind the extra durability from its Gorilla Glass build gave me. Plus I also like how Kolari Vision is a smaller company that is easy to get in touch with if I did have any questions about its products.
Surprisingly, the B+W SC 110 ND 3.0 Filter didn’t perform as well as I thought it would have. When compared to the Kolari Pro ND and PolarPro Quartzline ND, the B+W filter had a more prominent orangish color cast and heavier vignetting.
Yes, it’s possible to fix any color cast using photo editing software like Adobe Lightroom. However, because of their consistent performance, either the Kolari Pro ND or PolarPro Quartzline ND1000 filter are the better options.
Here are raw image comparisons straight from the camera between the premium ND filters from each location. All these images have not been edited.


Testing Methodology

First things first. If you’ve never read one of my reviews before, then you should know that the testing I do is never super technical.
I found that most ND filter reviews rely on testing ND filters in an artificial environment.
Testing in a studio setting has its place, however, I think to get the best idea of how an ND filter performs, you actually need to get out and use them to understand how well they work in changing light and an unpredictable environment.
To test these ND filters, I brought the ND filters on a week-long trip through Washington State and the Oregon Coast for in-field testing at 3 different locations. After the trip, I then set up a small test indoors to test the ND filters in a studio setting.
Overall, the in-field testing included the following steps:
- Used only the 10 stop version of each ND filter as I wanted to be able to expose for longer durations of time in any lighting condition.
- In-field testing at 3 different locations in Washington State and the Oregon Coast. Each location was shot at sunrise but in different weather conditions and cloud coverage.
- I used aperture priority to get an exposure baseline and then used the Lee Filters Exposure App to calculate the total exposure time.
- At each in-field location, I shot two exposures of the same composition with each ND filter. I tried to keep the exposure time the same but had to adjust some exposures slightly based on the lighting condition at the moment.
- I then compared the raw image results before any exposure and white balance adjustments and after exposure and white balance adjustments.
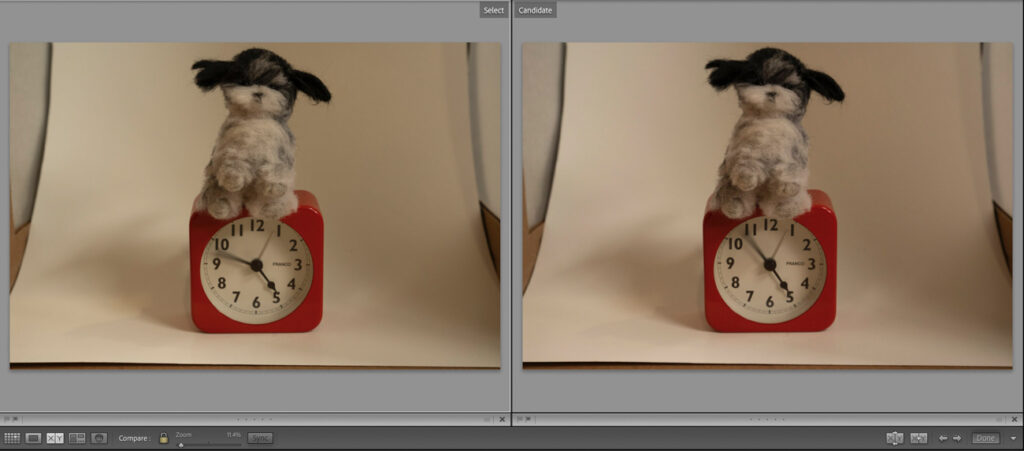
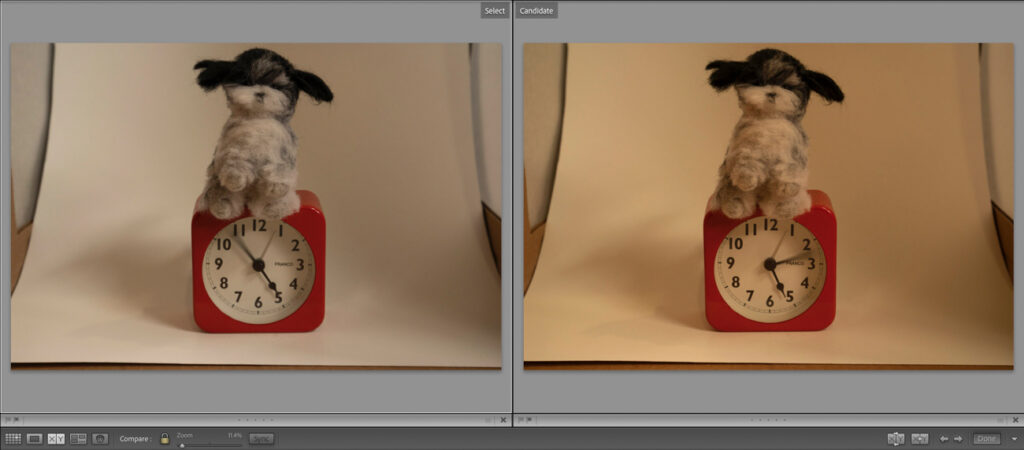
The small indoor test included the following steps:
- Used a small stuffed dog on top of a running clock as props. The stuffed dog remained fixed while the second hand of the clock showed the motion created from the long exposure.
- Placed the props inside a lightbox with a white background. The white background made it easier to see if there was any color cast from the ND filter in this environment
- Used aperture priority to get an exposure baseline and then used the Lee Filters Exposure App to calculate the total exposure time.
- Shot 2 exposures with each ND filter at 90 seconds and 120 seconds. Since it was an artificial environment, I was able to use the same exposure for all ND filters. The benefit of this is that it shows which ND filters are darker than others.
- I then compared the raw image results before any exposure and white balance adjustments and after exposure and white balance adjustments.
Importance of Testing In the Field vs Studio Testing

The reason why it’s important to test ND filters in a variety of different conditions is that they can actually perform differently depending on the lighting and color of the environment.
In general, premium ND filters like the Kolari Pro ND and PolarPro Quartzline create consistently good results with a more neutral color cast in any environment.
On the other hand, mid-range and budget ND filters can struggle in certain environments and can have more vignetting and color cast depending on the type of lighting and colors present in the composition.
What’s tricky about testing ND filters is that any flaw with a given ND filter might not be as obvious in a more neutral environment, such as on a cloudy gray day with flat light or in a studio setup.
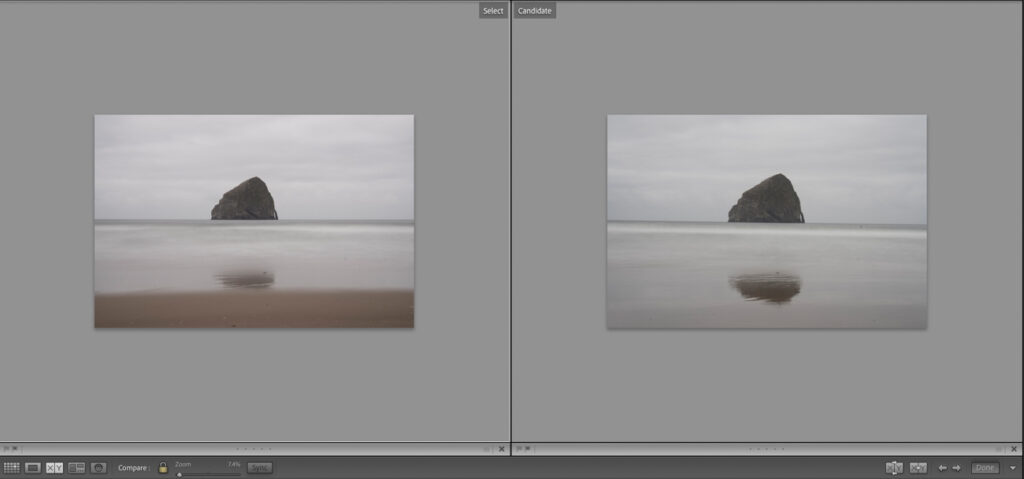
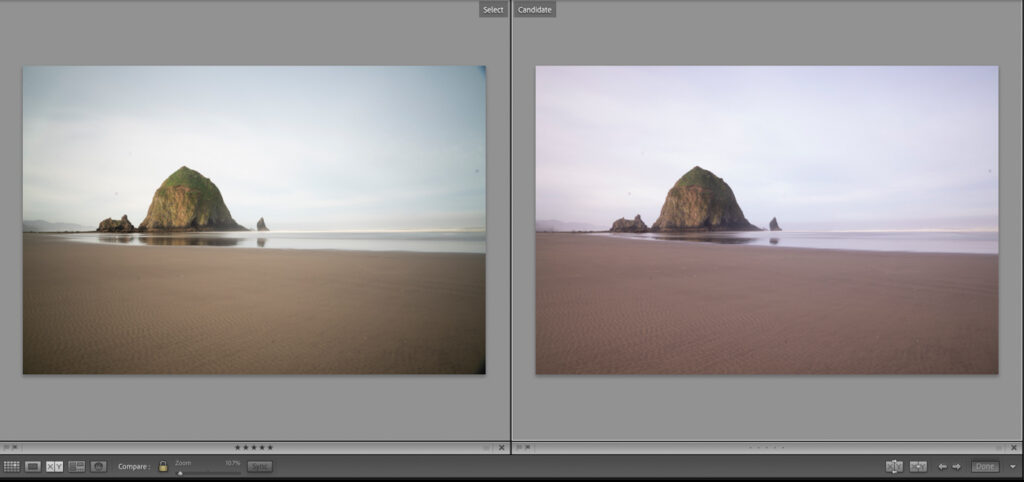
For example, here is a comparison shot on a cloudy gray day between the Kolari Pro ND (premium filter) and the Gobe ND1000 Filter (mid-range filter). Both photos were shot with the same aperture, ISO, and exposure time.
Testing at Cape Kiwanda State Natural Area, Oregon
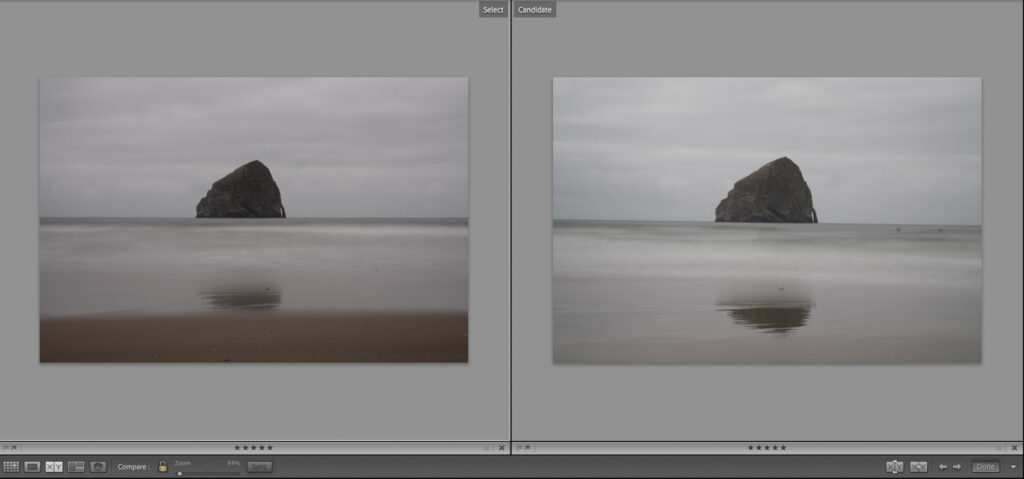
From this comparison, you can see that both filters performed very similarly. It looks like the Gobe ND1000 was exposed slightly more, but in general, there is not much difference in terms of vignetting or color cast.
My guess is that the overall grayness of the scene and the flatness of the light offset any vignette and color cast from the ND filters.
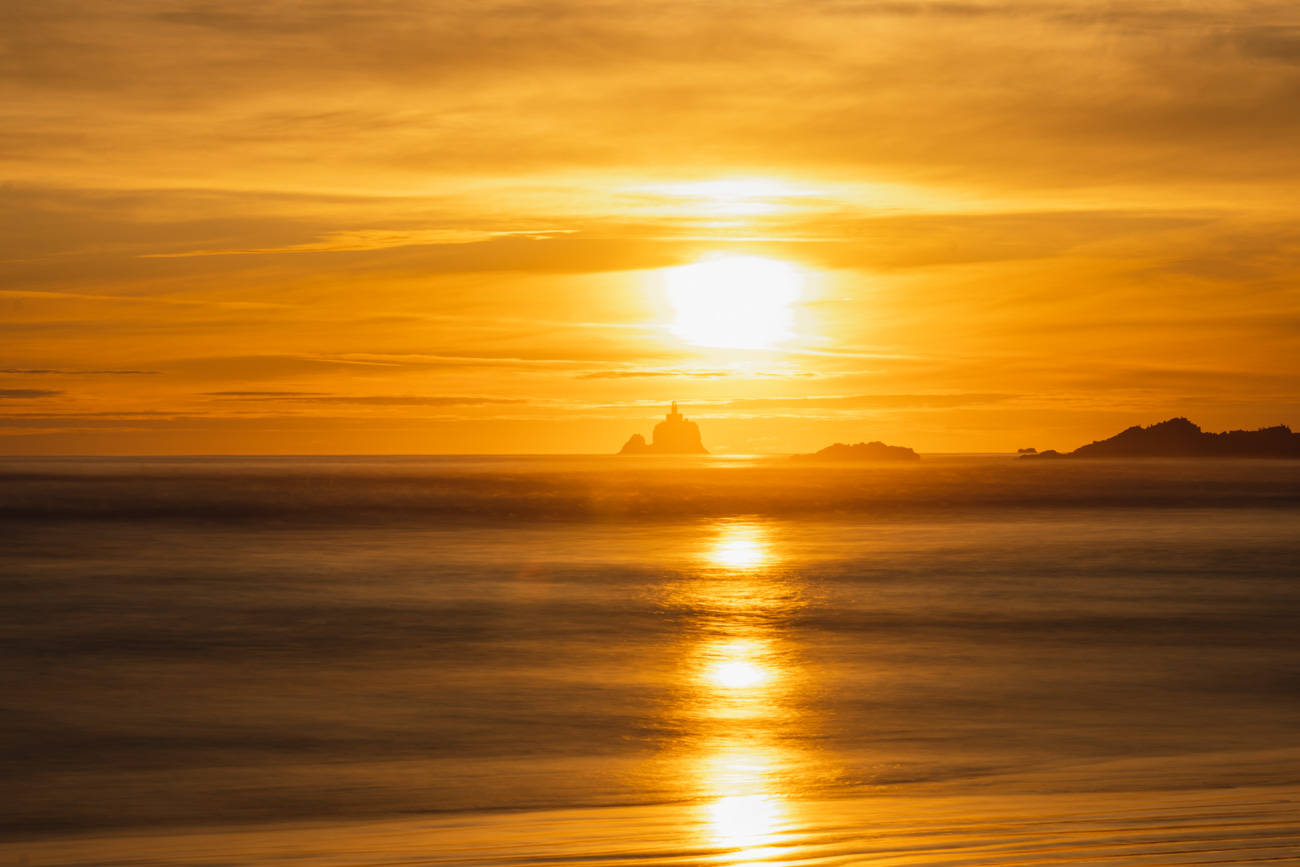
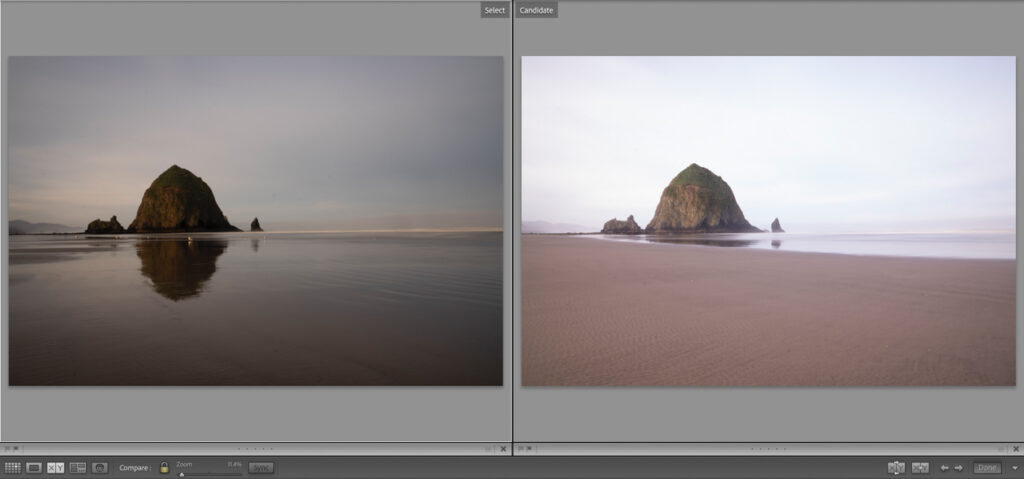
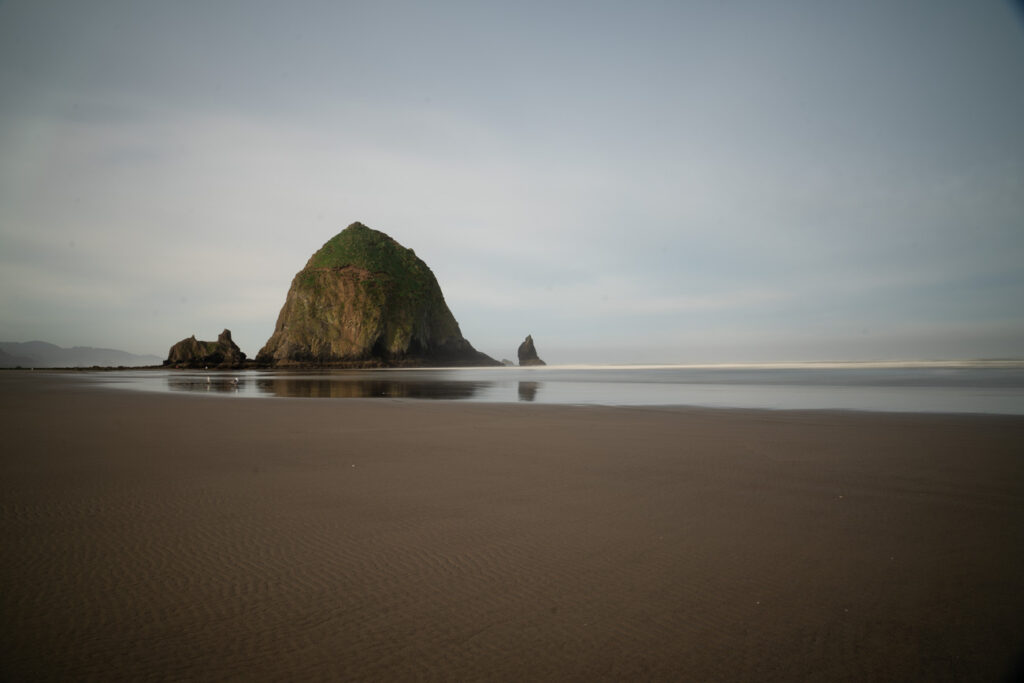
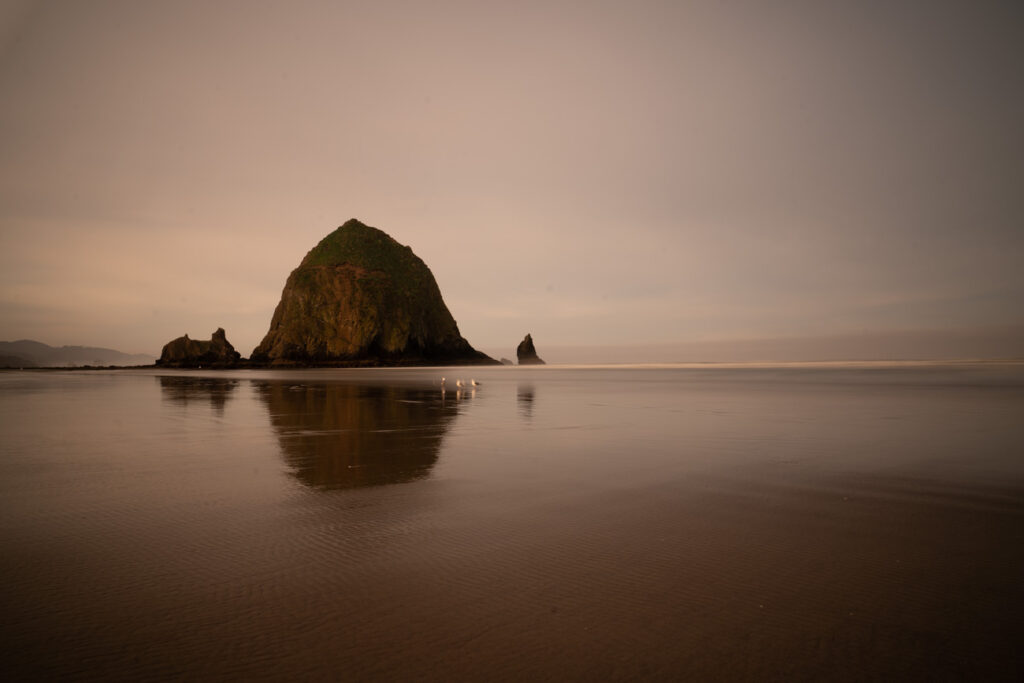
However, take a look at this next example that was shot right after sunrise at Cannon Beach.
This situation had a much greater dynamic range and different colors. The Kolari Pro ND filter is again on the left and the Gobe ND1000 filter is on the right. Both images were shot with the same aperture, ISO, and exposure time.
Testing at Cannon Beach, Oregon
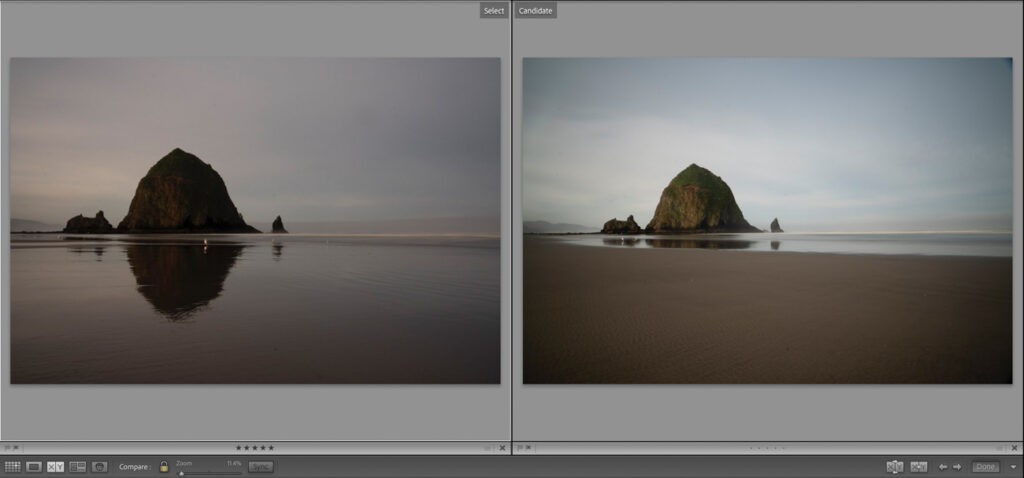
As you can see from this image, the Kolari filter has been evenly exposed throughout the entire image. There is also little to no color cast. Some of you might say that the Kolari image looks slightly underexposed compared to the Gobe filter, but this is ok. Since the exposure is consistent, it’s much easier to edit the photo produced with the Kolari Pro ND because of the even exposure.
Now moving to the Gobe filter. From this image, you can now see a much heavier vignetting with the Gobe filter. There’s also a slightly green blue color cast which is more apparent when compared to the Kolari Pro ND.
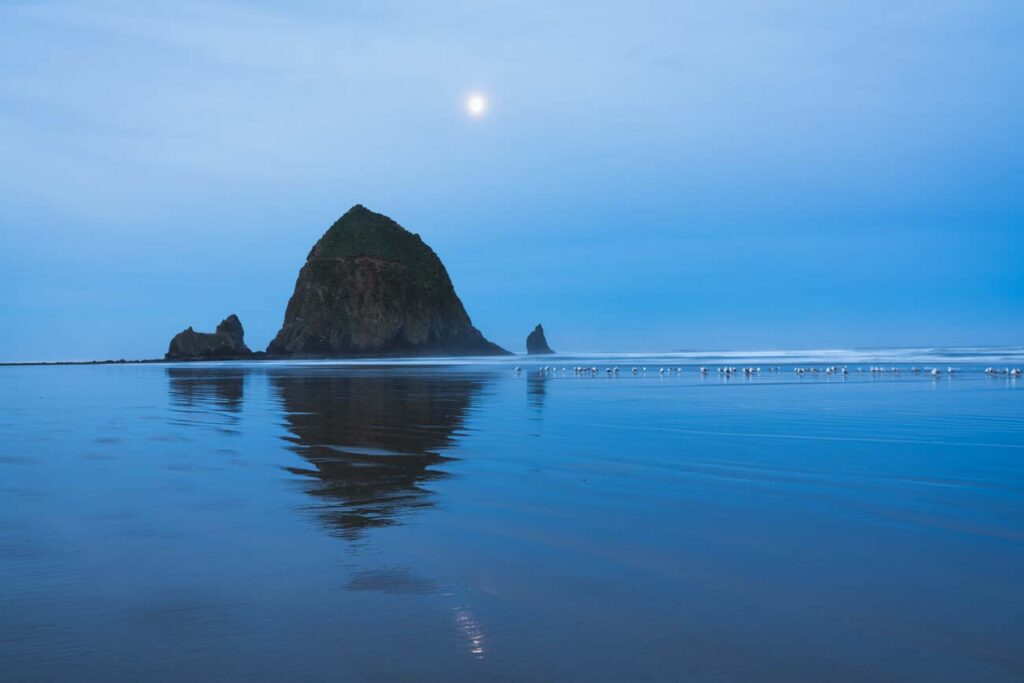
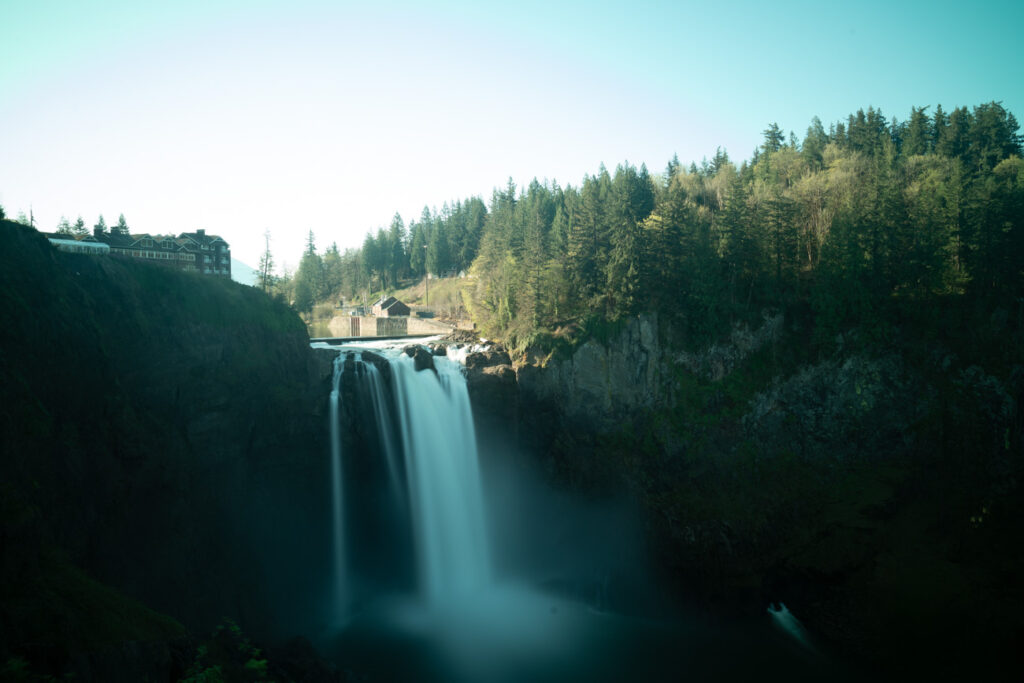
Here’s one more example from my Snoqualmie Falls testing session comparing the Kolari Pro ND (on the left) to the Gobe ND Filter (on the right).
Testing at Snoqualmie Falls, Washington State

In this comparison, the color cast from the Gobe filter isn’t as apparent. However, vignetting is clearly seen in the top right corner of the image made with the Gobe filter.
These three sets of images are a good example of why it’s important to review an ND filter’s performance against a variety of different environments.
In these examples, if testing was only conducted at Cape Kiwanda on a cloudy day it would have appeared that both ND filters performed similarly.
However, that’s not the whole story.
After further testing at Cannon Beach and Snoqualmie Falls, it’s apparent that the Gobe filter has more pronounced vignetting and a heavier color cast than the Kolari Pro ND filter.
Why Mid-Range ND Filters Are the Worst Option

Since it was impossible for me to test every ND filter in the market, these comparison tests between ND filters at different price categories can give you a good idea about what to expect from each price range and which category fits your workflow.
Realistically, the best choice is between premium ND filters and budget ND filters.
This is because mid-range ND filters are about 2-3x more expensive than budget ND filters, but have an equal or worse performance than budget ND filters.
Not surprisingly, premium ND filters perform the most consistently across a variety of different environments and lighting conditions. This means they had the least vignetting and color cast across the 4 different photo locations when compared to mid-range or budget filters.
However, if you’re not a serious photographer or only plan to use an ND filter sparingly, budget ND filters are actually a pretty decent option.
Even though a budget ND filter like the Newwer Pro ND1000 clearly has a more pronounced color cast and can let in roughly 1 stop more light, it actually doesn’t have that bad of vignetting and will still allow you to create very usable long exposure photographs.
If you’re considering a budget ND filter, what’s most important to keep in mind is that there can be a wide variance in performance between different budget ND filters.
The Newwer Pro ND1000 performed pretty well throughout the testing and I’m happy to recommend it. With that said, if you’re looking at any other budget ND filter option, make sure to do your research before buying.
Here are a couple of examples comparing the performance between the premium ND filters and mid-range ND filters to the budget Newwer Pro ND1000.
As you will see from the examples, budget filters can still hold their own, especially when considering how much cheaper they are.
Example #1 – Kolari Pro ND (Premium Filter) vs Newwer Pro ND1000 (Budget Filter)
This is a good comparison example that shows two of the biggest potential downsides with budget ND filters. Even with these downsides, the good news is that you’re still able to create a very sharp usable image with minimal vignetting.
Potential Downsides with a Budget ND Filter
- Letting in More Light than Stated: Both ND filters are listed as 10 stop ND filters. I used the same settings to create these two images so they should theoretically have the same exposure. However, as you can see, the Newwer ND filter appears to block ~1 stop less light than the Kolari filter. In some situations, this won’t be a big deal, however, this might make it more difficult to calculate how long to expose your photograph for.
- Color Cast: The Newwer ND filter has a more purplish color cast to the image vs the more neutral color profile of the Kolari ND filter. A heavier color cast can be edited using photo editing software but might be difficult depending on whether or not you have a neutral color in your image to use for your white balance correction.
Example #2 Gobe ND1000 Filter (Mid-Range Filter) vs Newwer Pro ND1000 (Budget Filter)
This is a good comparison example that shows how budget ND filters can outperform mid-range ND filter options.
From these two images, you can clearly see the Gobe filter has more significant vignetting than the Newwer filter. Both the images have a noticeable color cast with the Gobe ND filter having a slightly greenish color cast vs the blueish/purplish color cast of the Newwer filter.
The Newwer ND filter also lets in roughly .5 – 1 stop of extra light which was also shown in the previous example.
Although the Newwer ND filter has its downsides such as its purplish color cast and that it lets in more light, the final image is still easier to use because of its minimal vignetting. Plus, when you take into consideration its price at under $20, it’s a no-brainer if you’re comparing this filter to a mid-range option like the Gobe ND1000.
What to Look for in the Best ND Filter

What I hope you have learned so far is that the best ND filters perform consistently across a variety of different environments and lighting conditions.
They have little to no color cast, are able to produce neutral color profiles making the images easier to edit, and have very minimal vignetting if any vignetting at all.
Here is what to look out for when it comes to spotting ND filters with noticeable color cast and heavy vignetting. Again, ND filters at any budget category can have these flaws, but they’re most common with mid-range and budget ND filter options.
Color Cast
The color cast can come in a variety of different colors ranging from orangish to greenish-blue to purple.
What’s important to understand is that in many cases, you can fix a color cast using the white balance function of photo editing software.
With that said, the heavier the color cast, the harder it will be to fix.
Additionally, when using photo editing software, it might be hard to edit out a color cast if you don’t have a neutral color in the photo to use as the base of the white balance adjustment.
Here’s an example of what a heavy color cast can look like and how difficult it is to fix even using Adobe Lightroom. This image was shot with the Tiffen XLE Series Axent ND Filter, which is a mid-range option.
As you can see in this first image, this filter produced a very heavy yellow-green color cast at this location at Snoqualmie Falls.
To fix the image in Adobe Lightroom, I tried using the white balance dropper tool. Even though I have the neutral white color of the waterfall to base the white balance adjustment on, this is how the image turned out.

The image is usable. However, the colors are definitely off and don’t produce the best result especially considering it’s a mid-range ND filter option.
Vignetting
Vignetting is the darker shadows that you see at the edge of the images and can be caused by an ND filter.
Poorer performing ND filters will have heavier vignettes.
The reason why you want to be careful with vignettes caused by an ND filter is that heavy vignetting can be extremely hard to fix later on unless you want to crop into your image.
Here are a few examples of heavy vignetting from the ND filters I tested for this article.

Conclusion

In conclusion, I hope you have learned something new about ND filters from this article and have a better understanding of what category (premium or budget) ND filters work better for your workflow.
Overall, my pick is the Kolari Pro ND because of its consistent neutral color profile performance across a variety of different conditions, its lack of vignetting, and the peace of mind I have from its extra durability.
Although they’re newer to the ND filter space, if you’re a serious photographer or are aspiring to be one, I definitely encourage you to give the Kolari Pro ND a look.
With that said, if you’re on a tight budget or you just want to take long-exposure photographs to share with your family and friends, the Neewer Pro ND1000 Filter is a surprisingly good budget option too!
If there are any ND filters that I missed that you’re curious about or if you have any questions, feel free to reach out to me via email at [email protected] or DM at my Instagram @tom.shu. I answer all questions that are sent!
Thanks for joining me on this adventure into the world of ND filters 🙂