
In this articles, you will learn how to fix overexposed photos in Adobe Lightroom. Lightroom is a great application for photographers that helps you process as well as catalog your photos.
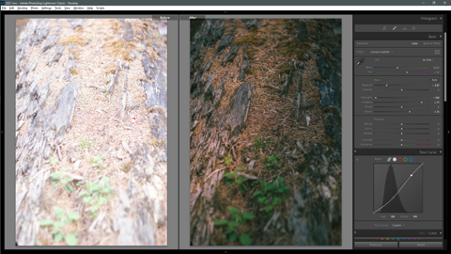
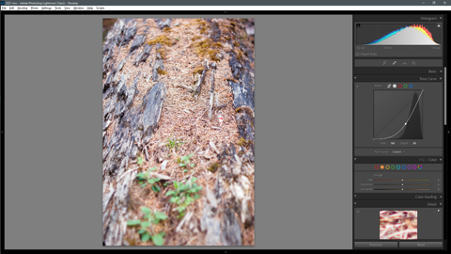
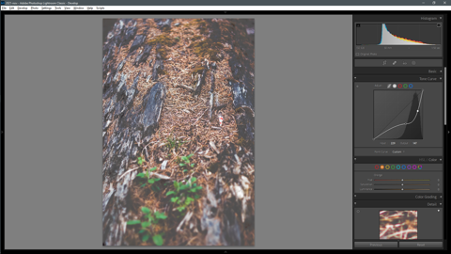
If you want to learn how to go from the image on the left to one on the right, keep reading.
What is an Overexposed Photo?
An overexposed photo is one where the sensor receives too much light. As a result, bright areas of the image became ‘burned.’ You will see an example below. Overexposure can happen due to high ISO, slow shutter, large aperture, or some combination of all three.
Fix Overexposed Photos In Lightroom Using The Exposure Slider
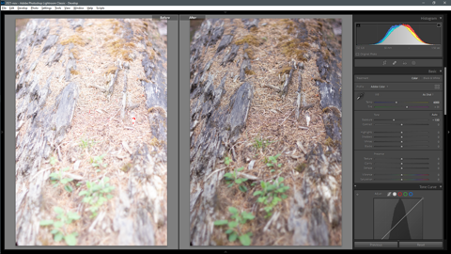
Here is a seriously overexposed image. As you can see, it is very bright and very white. This is what I meant by “burned.” This was taken on a bright summer morning on the side of a mountain. All of those factors contribute to powerful daylight.
On the right hand side, you can see the ‘Basic’ panel. Here you have all the tools you will need for fixing this image. Later in this article, I will briefly touch on using the tone curve and masks for fixing overexposed photos in Lightroom.
In the Basics panel, you will see the exposure slider. In most cases, just dragging the exposure slider will fix your image immediately. We will drag it to the left to decrease the amount of light overall.
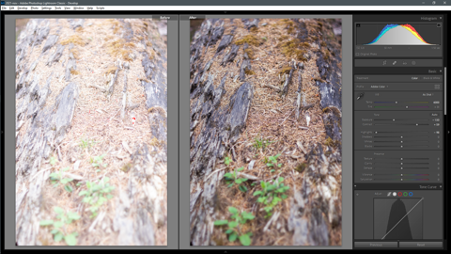
I have decreased it by 1 f/stop, and already we see improvements.
At -1.5 f/stop, it is looking reasonably natural, so I will stop here. Now let’s tweak the tone sliders and the contrast slider to fine-tune the image.
Note that I have increased the contrast but reduced the highlights drastically. Overexposed images tend to be very ‘hot’ in the highlights, which makes them look unnatural. Reducing the highlights gives it a more natural, soothing look.
For a more in-depth look at this, check the post I made on how to reduce harsh shadows in the lightroom. I have talked about the tone sliders in detail there.
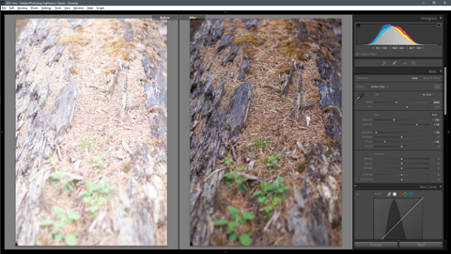
I have also reduced the whites, and the image is starting to look even better. The details in the mid-tones are much more pleasing to look at now.
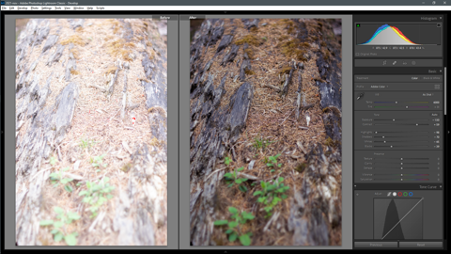
Now I have adjusted the shadows and blacks. The difference is subtler than the previous adjustments but noticeable nonetheless.
After adjusting exposure and contrast, I am making progressively finer adjustments to the balance of light tones in my image using the tone sliders. I haven’t even touched the colors yet.
It is important to note that the amount of adjustment will vary from image to image, camera to camera, and person to person. This is purely a matter of taste.
I am going for a natural look with well-balanced contrast and a somewhat low dynamic range to properly expose everything in the image.
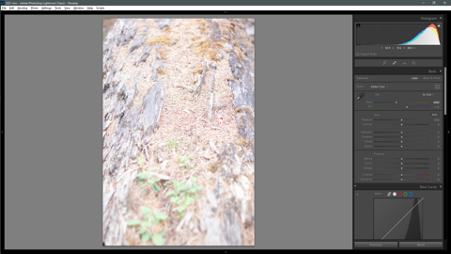
Notice the histogram in each of the images. The histogram shows the presence of image data from darkest to brightest, moving left to right.
See how the histogram (the main one on top or the one inside the tone curve box) changes with each image. In the initial image, we can see a lot of activity in the brightest parts of the tone spectrum but nothing below. In the last screenshot, there is a lot of activity just below the midpoint. This is an excellent visual representation of the kind of balance I wanted.
Fix Overexposed Photos in Lightroom Using The Tone Curve
The tone curve gets its own panel that is set up right below the Basics panel. Lightroom’s panels are organized in order to use. You would generally want to start from the exposure slider and work your downwards. You will thus move through the various sliders in the Basic panel, go into the Tone Curve, and beyond.

Here we are back to the original image. It is very hot and looks burned. This time, we will use only the tone curve. Based on what you have learned already, you might have guessed that we will need to adjust the tone curve on the right side, which deals with the brightest part of the tone spectrum.
To do this, simply click on the tone curve to create a point and then drag to adjust it. You can also click on the terminal points on either side and drag them to make adjustments. Give it a try, and you will immediately begin to see how it changes your image. After that, it is just a matter of practice and taste.
A single adjustment has produced significant changes in the image, but it needs more work—the curve is currently pushing down the left part, the darker areas, a bit too much.
So I adjusted with a second point targetted at the peak of the image. It has given us an interesting look and shows us how the tone curve can be used creatively. You will notice these changes as you start to use it more. Pay attention, and you will learn how to create your own artistic ‘looks’ or presents.

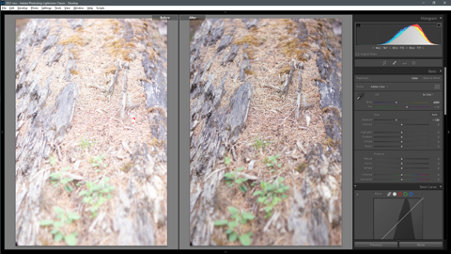
Since I am going for a more natural look, I mode the points around to create a more natural curve. I also adjusted the left terminal point down. This last adjustment took away most of the extreme highlights. As you can see from the histogram on top, our image is more balanced now.
Play around with the tone curve every chance you get. Once you get used to it, click on the RGB buttons on top of the tone curve box. These will give you curves for the three primary colors — Red, Green, and Blue. Refer to my article on how to reduce shadows in Lightroom for more details on this part.
Fix Overexposed Photos in Lightroom Using Masks
Let’s say I have an image where only one part is overexposed. Maybe that part was in the sun, and the rest of the image was in the shade. In that case, I would have to make a ‘local adjustment.’ This is where the masks come in.
Lightroom 2022 has a very sophisticated masking section. Here I will use the radial mask.
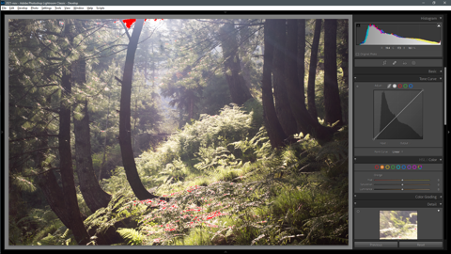
This photo is mostly okay, but there is a hot area in the middle where the sun is coming in. Let’s use a radial mask to balance that area and make it look more natural.
On top of the Basic panel, there are several buttons. On the extreme right is a circular button that opens the Mask panel. You can also use Shift-M to switch to it quickly. Then drag and draw a circle or ellipse on top of the area you want to adjust.
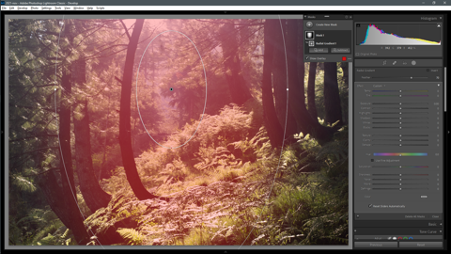
Once you select a tool, a new panel appears in the same place. It has all the options of the Basic panel plus a few extras. If you haven’t made any adjustments, your mask will show up like this.
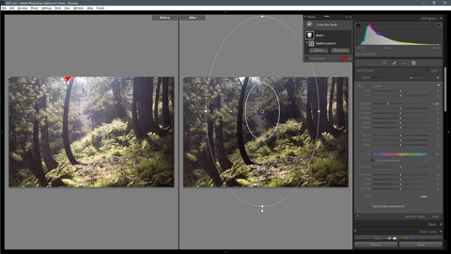
I have adjusted down the exposure, and already the photo looks more balanced.
From here you can take it wherever you like. I am going to make a few different adjustments to create a warm mood.

Now it is looking more like a morning scene. Let’s use everything we have learned and see how far we can take it.
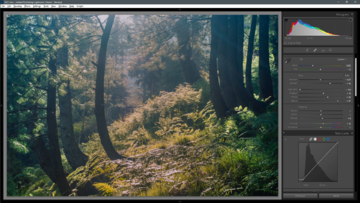
This is where I decided to stop. At this point, it depends on your taste and goals for the image. I tried to make it look like a misty morning in the mountains.
Conclusion
Combining all of these techniques can create complex light and shadow dynamics in absolutely flat, overexposed images. Such as the first example. Here’s what it can look like after adjustments. It is a whole new image.

I hope this helps you recover overexposed images. RAW files will give you the most flexibility in this regard, which is why I recommend shooting RAW. However, even JPEGs have a fair amount of image data to pull and push tones.
Drop a comment here or on my Instagram if you have a question. I always answer every question I get. Share this post with your friends and followers to help them learn Lightroom.